课程相关的资源、视频和教材见Lab util: Unix utilities 开头。
这次的实验需要我们自己手动的尝试添加系统调用,另外第二章教材大致介绍了一下操作系统的特性和设计理念,并针对xv6操作系统简单的介绍了其启动流程,并以exec为例介绍了系统调用的流程。
准备
对应课程
本次作业是Lab Syscall,需要我们实现两个新的系统调用,我们需要看掉Lecture 3,也就是B站课程 的P2,另外请阅读教材第二章Operating system organization,了解操作系统的设计理念,并了解xv6系统的启动原理和系统调用的过程。
系统环境
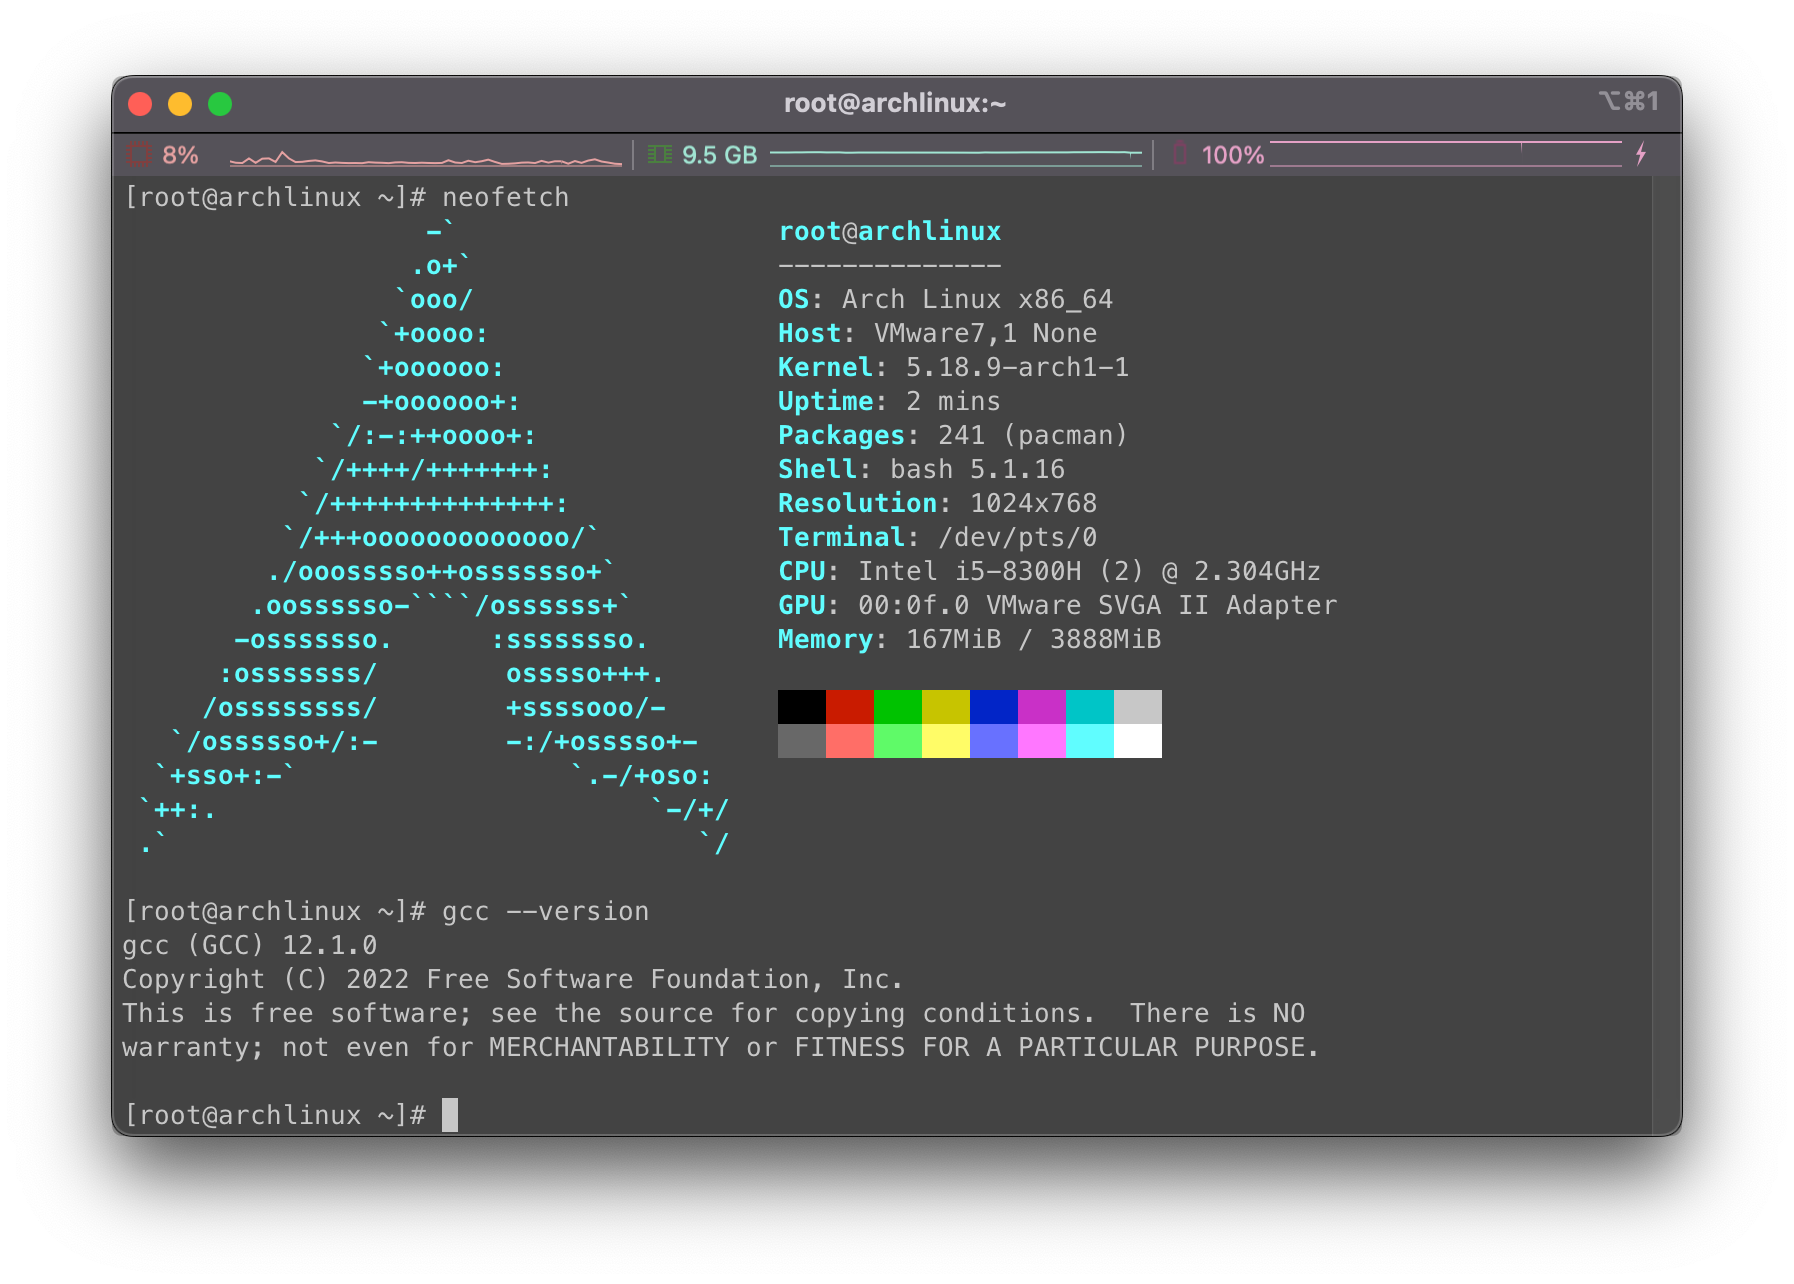
使用Arch Linux虚拟机作为实验环境~
环境依赖配置,编译使用make qemu等,如遇到问题,见第一次的Lab util: Unix utilities
使用准备
参考本次的实验说明书:Lab: system calls
从仓库clone下来课程文件:
1 git clone git://g.csail.mit.edu/xv6-labs-2021
切换到本次作业的syscall分支即可:
1
2
cd xv6-labs-2021 git checkout syscall
在作业完成后可以使用make grade对所有结果进行评分。
题目
系统调用过程
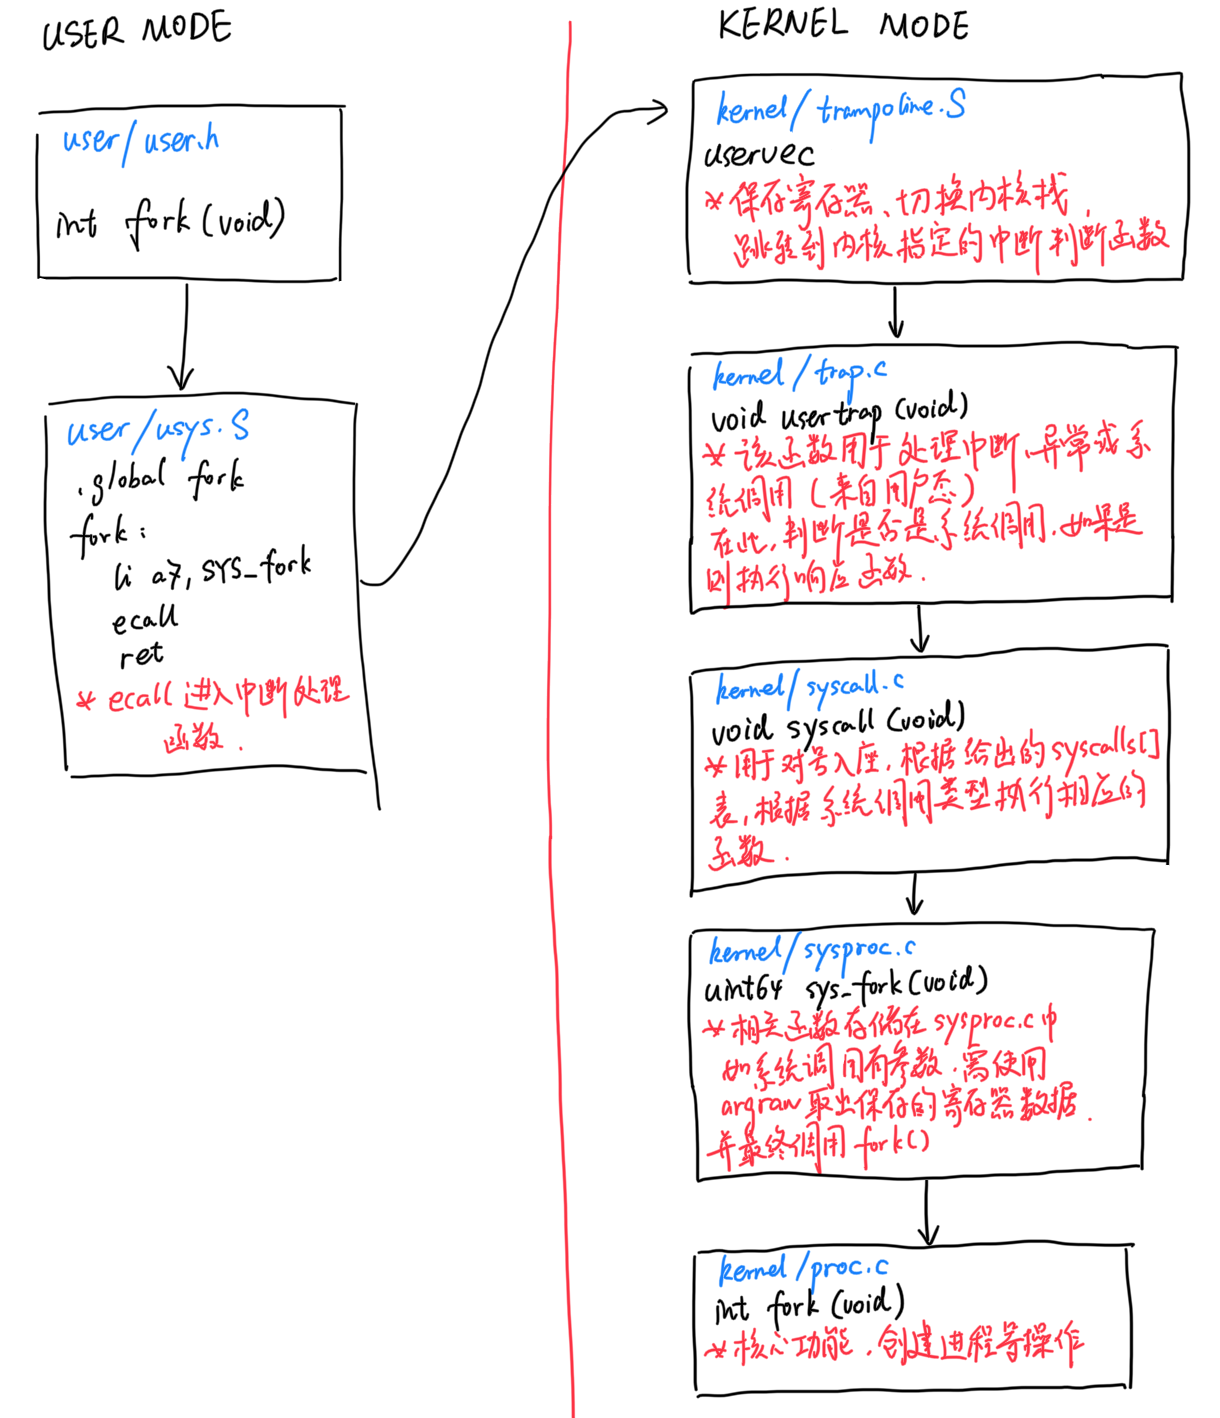
首先我们来看一下xv6操作系统下一个系统调用的实现过程(其实相关的过程在上次的Lab中已经分析了一些了),以fork为例。
系统调用声明
当我们调用fork()函数时,其已经被预先声明在了user/user.h中:
1 2 3 4 5 6 7 8 9 10 11 12 13 14 15 16 17 18 19 20 21 22 int fork (void ) ;int exit (int ) __attribute__ ((noreturn )) ;int wait (int *) ;int pipe (int *) ;int write (int , const void *, int ) ;int read (int , void *, int ) ;int close (int ) ;int kill (int ) ;int exec (char *, char **) ;int open (const char *, int ) ;int mknod (const char *, short , short ) ;int unlink (const char *) ;int fstat (int fd, struct stat*) ;int link (const char *, const char *) ;int mkdir (const char *) ;int chdir (const char *) ;int dup (int ) ;int getpid (void ) ;char * sbrk (int ) ;int sleep (int ) ;int uptime (void ) ;
ecall进入内核态接下来我们会进入到user/usys.S中,此时我们还处在用户态,我们将系统调用的编号写入a7寄存器,并使用ecall进入中断处理函数:
1
2
3
4
5
6
#include "kernel/syscall.h" .global fork fork: li a7, SYS_fork ecall ret
需要注意的是这段代码其实是通过user/usys.pl生成的,后续如果需要添加系统调用不需要在usys.S中添加,在这里添加即可:
1 2 3 4 5 6 7 8 9 10 11 12 13 14 15 16 17 18 19 20 21 22 23 24 25 26 27 28 29 30 31 32 33 34 35 36 37 38 print "# generated by usys.pl - do not edit\n" ;print "#include \"kernel/syscall.h\"\n" ;sub entry my $name = shift ; print ".global $name\n" ; print "${name} :\n" ; print " li a7, SYS_${name} \n" ; print " ecall\n" ; print " ret\n" ; } entry("fork" ); entry("exit" ); entry("wait" ); entry("pipe" ); entry("read" ); entry("write" ); entry("close" ); entry("kill" ); entry("exec" ); entry("open" ); entry("mknod" ); entry("unlink" ); entry("fstat" ); entry("link" ); entry("mkdir" ); entry("chdir" ); entry("dup" ); entry("getpid" ); entry("sbrk" ); entry("sleep" ); entry("uptime" );
其中编号别名见kernel/syscall.h:
1 2 3 4 5 6 7 8 9 10 11 12 13 14 15 16 17 18 19 20 21 22 #define SYS_fork 1 #define SYS_exit 2 #define SYS_wait 3 #define SYS_pipe 4 #define SYS_read 5 #define SYS_kill 6 #define SYS_exec 7 #define SYS_fstat 8 #define SYS_chdir 9 #define SYS_dup 10 #define SYS_getpid 11 #define SYS_sbrk 12 #define SYS_sleep 13 #define SYS_uptime 14 #define SYS_open 15 #define SYS_write 16 #define SYS_mknod 17 #define SYS_unlink 18 #define SYS_link 19 #define SYS_mkdir 20 #define SYS_close 21
保存数据并跳转判断函数
接下来我们进入内核态,在kernel/trampoline.S中的uservec中,我们将寄存器中的数据进行保存,并切换到内核栈,切换栈指针SP等操作。最后我们跳转到内核指定的中断判断程序,也就是kernel/trap.c的usertrap函数:
1
2
3
4
5
6
7
8
9
10
11
12
13
14
15
16
17
18
19
20
21
22
23
24
25
26
27
28
29
30
31
32
33
34
35
36
37
38
39
40
41
42
43
44
45
46
47
48
49
50
51
52
53
54
55
56
57
58
59
60
61
62
63
64
65
66
67
68
69
70
71
.globl uservec uservec: # # trap.c sets stvec to point here, so # traps from user space start here, # in supervisor mode, but with a # user page table. # # sscratch points to where the process's p->trapframe is # mapped into user space, at TRAPFRAME. # # swap a0 and sscratch # so that a0 is TRAPFRAME csrrw a0, sscratch, a0 # save the user registers in TRAPFRAME sd ra, 40(a0) sd sp, 48(a0) sd gp, 56(a0) sd tp, 64(a0) sd t0, 72(a0) sd t1, 80(a0) sd t2, 88(a0) sd s0, 96(a0) sd s1, 104(a0) sd a1, 120(a0) sd a2, 128(a0) sd a3, 136(a0) sd a4, 144(a0) sd a5, 152(a0) sd a6, 160(a0) sd a7, 168(a0) sd s2, 176(a0) sd s3, 184(a0) sd s4, 192(a0) sd s5, 200(a0) sd s6, 208(a0) sd s7, 216(a0) sd s8, 224(a0) sd s9, 232(a0) sd s10, 240(a0) sd s11, 248(a0) sd t3, 256(a0) sd t4, 264(a0) sd t5, 272(a0) sd t6, 280(a0) # save the user a0 in p->trapframe->a0 csrr t0, sscratch sd t0, 112(a0) # restore kernel stack pointer from p->trapframe->kernel_sp ld sp, 8(a0) # make tp hold the current hartid, from p->trapframe->kernel_hartid ld tp, 32(a0) # load the address of usertrap(), p->trapframe->kernel_trap ld t0, 16(a0) # restore kernel page table from p->trapframe->kernel_satp ld t1, 0(a0) csrw satp, t1 sfence.vma zero, zero # a0 is no longer valid, since the kernel page # table does not specially map p->tf. # jump to usertrap(), which does not return jr t0
每个进程都对应一个状态结构体proc,我们就是将数据存储在这里,代码见kernel/proc.h:
1 2 3 4 5 6 7 8 9 10 11 12 13 14 15 16 17 18 19 20 21 22 23 24 struct proc { struct spinlock lock ; enum procstate state ; void *chan; int killed; int xstate; int pid; struct proc *parent ; uint64 kstack; uint64 sz; pagetable_t pagetable; struct trapframe *trapframe ; struct context context ; struct file *ofile [NOFILE ]; struct inode *cwd ; char name[16 ]; };
中断判断函数
在kernel/trap.c的usertrap函数,其主要用于处理来自用户态的中断、异常或者系统调用,他将判断是否是系统调用,如果是则执行响应函数syscall:
1 2 3 4 5 6 7 8 9 10 11 12 13 14 15 16 17 18 19 20 21 22 23 24 25 26 27 28 29 30 31 32 33 34 35 36 37 38 39 40 41 42 43 44 45 46 47 48 49 50 51 52 53 void usertrap (void ) { int which_dev = 0 ; if ((r_sstatus() & SSTATUS_SPP) != 0 ) panic("usertrap: not from user mode" ); w_stvec((uint64)kernelvec); struct proc *p = p->trapframe->epc = r_sepc(); if (r_scause() == 8 ){ if (p->killed) exit (-1 ); p->trapframe->epc += 4 ; intr_on(); syscall(); } else if ((which_dev = devintr()) != 0 ){ } else { printf ("usertrap(): unexpected scause %p pid=%d\n" , r_scause(), p->pid); printf (" sepc=%p stval=%p\n" , r_sepc(), r_stval()); p->killed = 1 ; } if (p->killed) exit (-1 ); if (which_dev == 2 ) yield(); usertrapret(); }
执行对应系统调用
在kernel/syscall.c中,我们使用一张表syscalls,将系统调用的编号和对应的执行函数进行对应,并在syscall函数中根据所给编号执行。可以看到我们从保存的a7寄存器中读出了系统调用的编号,根据表执行了对应的方法:
1
2
3
4
5
6
7
8
9
10
11
12
13
14
15
16
17
18
19
20
21
22
23
24
25
26
27
28
29
30
31
32
33
34
35
36
37
38
39
static uint64 (*syscalls[]) (void ) = {[SYS_fork] sys_fork, [SYS_exit] sys_exit, [SYS_wait] sys_wait, [SYS_pipe] sys_pipe, [SYS_read] sys_read, [SYS_kill] sys_kill, [SYS_exec] sys_exec, [SYS_fstat] sys_fstat, [SYS_chdir] sys_chdir, [SYS_dup] sys_dup, [SYS_getpid] sys_getpid, [SYS_sbrk] sys_sbrk, [SYS_sleep] sys_sleep, [SYS_uptime] sys_uptime, [SYS_open] sys_open, [SYS_write] sys_write, [SYS_mknod] sys_mknod, [SYS_unlink] sys_unlink, [SYS_link] sys_link, [SYS_mkdir] sys_mkdir, [SYS_close] sys_close, }; void syscall (void ) { int num; struct proc *p = num = p->trapframe->a7; if (num > 0 && num < NELEM(syscalls) && syscalls[num]) { p->trapframe->a0 = syscalls[num](); } else { printf ("%d %s: unknown sys call %d\n" , p->pid, p->name, num); p->trapframe->a0 = -1 ; } }
系统调用的返回值传递给了a0,后续会回传给用户态。
系统调用函数
以fork为例,执行的相关函数方法sys_fork存储在kernel/sysproc.c中:
1 uint64 sys_fork (void ) { return fork(); }
对于fork而言,调用时不需要额外的参数。而对于其他系统调用,例如wait则需要我们读取寄存器刚被保存的参数:
1
2
3
4
5
uint64 sys_wait (void ) { uint64 p; if (argaddr(0 , &p) < 0 ) return -1 ; return wait(p); }
读取参数本质上就是从内存中恢复,较为简单,代码见kernel/syscall.c:
1
2
3
4
5
6
7
8
9
10
11
12
13
14
15
16
17
18
19
20
21
22
23
24
25
26
27
28
29
30
31
32
33
34
35
36
37
38
39
40
41
42
static uint64 argraw (int n) { struct proc *p = switch (n) { case 0 : return p->trapframe->a0; case 1 : return p->trapframe->a1; case 2 : return p->trapframe->a2; case 3 : return p->trapframe->a3; case 4 : return p->trapframe->a4; case 5 : return p->trapframe->a5; } panic("argraw" ); return -1 ; } int argint (int n, int *ip) { *ip = argraw(n); return 0 ; } int argaddr (int n, uint64 *ip) { *ip = argraw(n); return 0 ; } int argstr (int n, char *buf, int max) { uint64 addr; if (argaddr(n, &addr) < 0 ) return -1 ; return fetchstr(addr, buf, max); }
系统调用核心功能
以fork为例,其最后的核心功能和方法存储在kernel/proc.c中:
1 2 3 4 5 6 7 8 9 10 11 12 13 14 15 16 17 18 19 20 21 22 23 24 25 26 27 28 29 30 31 32 33 34 35 36 37 38 39 40 41 42 43 44 45 46 47 48 49 50 int fork (void ) { int i, pid; struct proc *np ; struct proc *p = if ((np = allocproc()) == 0 ){ return -1 ; } if (uvmcopy(p->pagetable, np->pagetable, p->sz) < 0 ){ freeproc(np); release(&np->lock); return -1 ; } np->sz = p->sz; *(np->trapframe) = *(p->trapframe); np->trapframe->a0 = 0 ; for (i = 0 ; i < NOFILE; i++) if (p->ofile[i]) np->ofile[i] = filedup(p->ofile[i]); np->cwd = idup(p->cwd); safestrcpy(np->name, p->name, sizeof (p->name)); pid = np->pid; release(&np->lock); acquire(&wait_lock); np->parent = p; release(&wait_lock); acquire(&np->lock); np->state = RUNNABLE; release(&np->lock); return pid; }
结论
综上一次系统调用可以看作以下几个部分:
这也给了我们相关的启示,如果我们需要添加一个系统调用,我们需要考虑以下几个位置:
在user/user.h中添加系统调用的函数声明。
在kernel/syscall.h中添加新系统调用的编号。
在user/usys.pl中添加系统调用项,生成相关汇编代码,即给a7寄存器赋值,使用ecall指令陷入内核态。
在kernel/syscall.c的syscalls表中添加新的映射关系,指向需要执行的函数(也需另外实现),例如fork系统调用就实现在kernel/sysproc.c和kernel/proc.c中。
实现系统调用trace
要求和提示
在这个部分中,我们添加一个用于追踪功能的系统调用,我们将创建一个名称为trace的系统调用,他将接受一个掩码mask作为参数,该参数的二进制每一位表示了哪一种系统调用需要被追踪,例如trace(1 << SYS_fork)表示需要追踪fork系统调用,其中SYS_fork是系统调用的别名,完整表见kernel/syscall.h,刚才也提及了,这里就不再列举了。
我们需要修改内核代码,使得程序当追踪的系统调用将要返回时打印一行日志,前提是该系统调用对应号码包含在掩码中。每次打印出来的日志需要包含进程ID 、系统调用名字 和返回值 ,我们无需打印出系统调用的参数。当trace系统调用被触发时,其应当追踪当前的调用进程以及与其相关的所有子进程,但是不应当涉及其他进程。
本Lab中已经实现了trace程序的基本功能,详见user/trace.c。
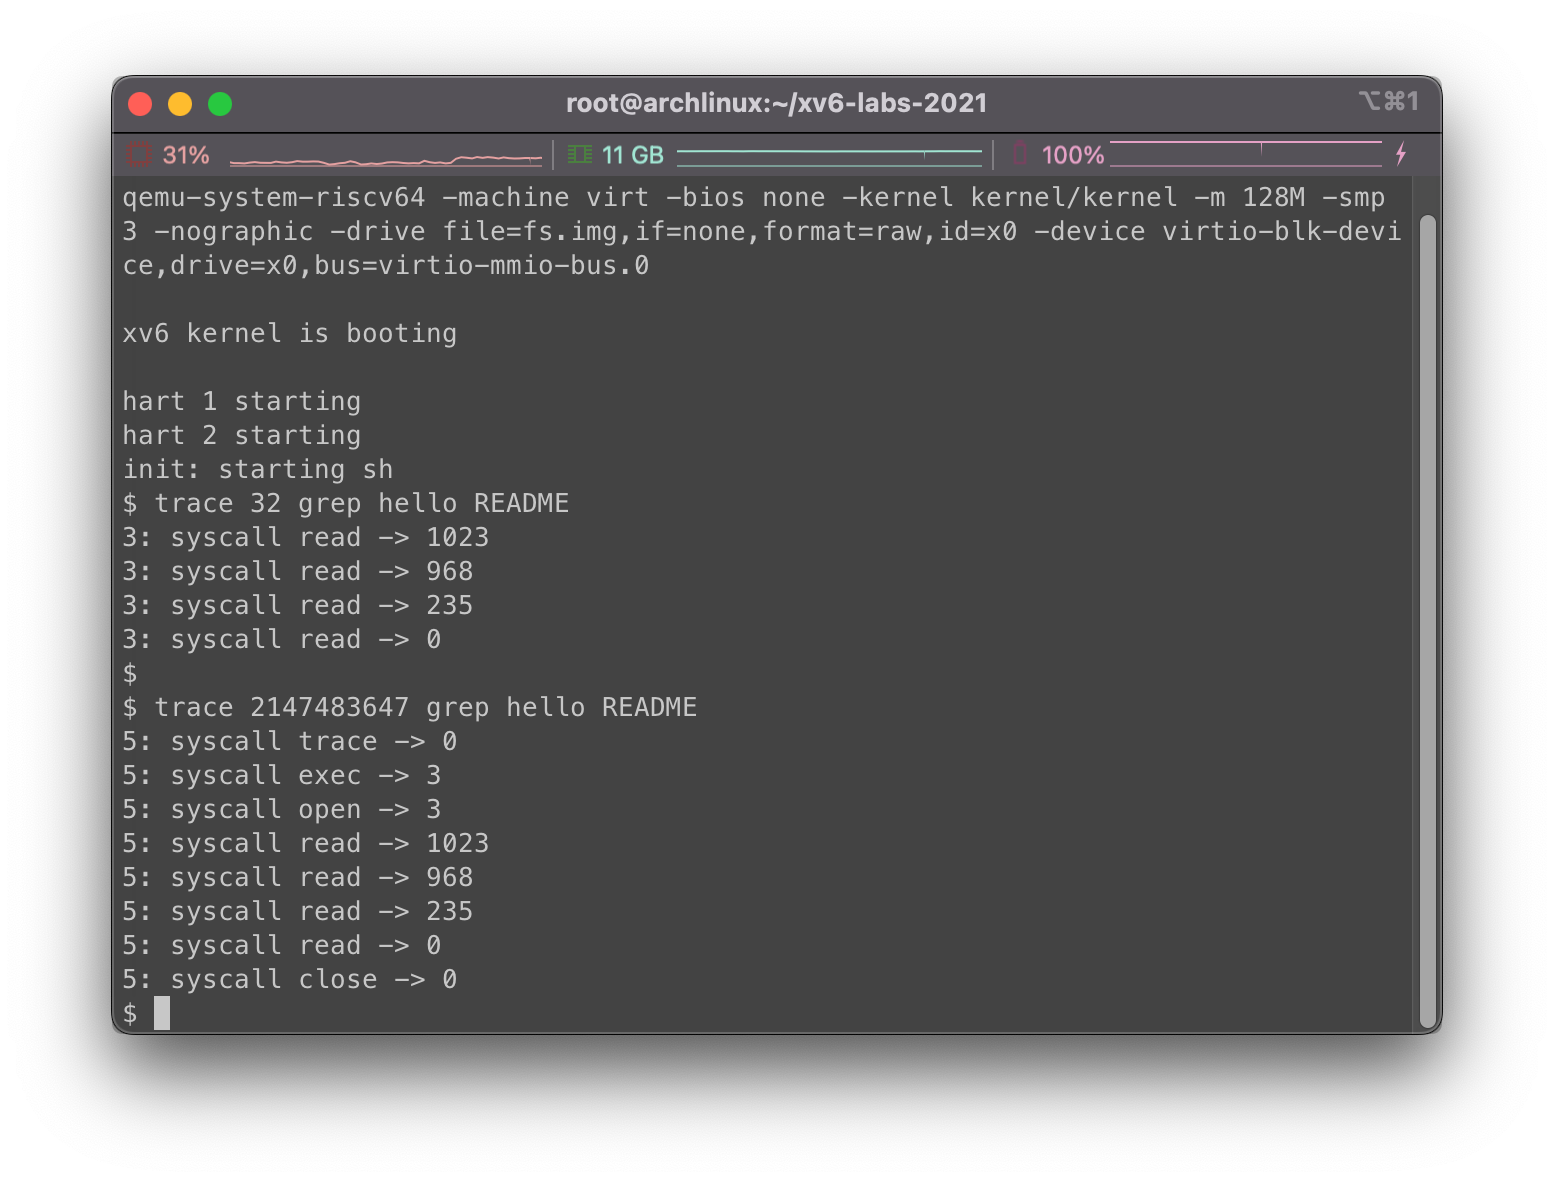
该程序的目标功能状态如下:
1
2
3
4
5
6
7
8
9
10
11
12
13
14
15
16
17
18
19
20
21
22
23
24
25
26
27
28
29
30
$ trace 32 grep hello README 3: syscall read -> 1023 3: syscall read -> 966 3: syscall read -> 70 3: syscall read -> 0 $ $ trace 2147483647 grep hello README 4: syscall trace -> 0 4: syscall exec -> 3 4: syscall open -> 3 4: syscall read -> 1023 4: syscall read -> 966 4: syscall read -> 70 4: syscall read -> 0 4: syscall close -> 0 $ $ grep hello README $ $ trace 2 usertests forkforkfork usertests starting test forkforkfork: 407: syscall fork -> 408 408: syscall fork -> 409 409: syscall fork -> 410 410: syscall fork -> 411 409: syscall fork -> 412 410: syscall fork -> 413 409: syscall fork -> 414 411: syscall fork -> 415 ... $
P.S. 虽然都叫trace,但是这明显是两个不相同的东西…
在命令行中使用的trace,是一个UNIX程序,他的文件在user/trace.c中,为了将其纳入编译,你还需要将其加入到Makefile的UPROGS中。
而我们要实现的trace是一个系统调用,我们需要在内核代码中实现,也就是kernel/目录下。在刚才的user/trace.c这个UNIX程序中的main函数中,调用到的trace(atoi(argv[1])也指该系统调用。
相关提示:
在Makefile的UPROGS中添加$U/_trace,将user/trace.c纳入编译范围。
如果直接运行make qemu,你会发现你无法编译user/trace.c,因为用户态中的trace系统调用还未声明,你需要在user/user.h和user/usys.pl中添加系统调用,并在kernel/syscall.h中添加系统调用编号。(这几点在刚才都提及了)。完成了这些准备工作再考虑实现内核代码中的系统调用。
在kernel/sysproc.c中添加一个sys_trace函数来实现新的系统调用,通过在进程的状态proc中插入一个新的变量(也就是我们需要对该进程跟踪的mask掩码)。从用户态获取系统调用参数的函数详见kernel/syscall.c(讲过了,就是刚才那个argraw什么的),使用示例见kernel/sysproc.c。
另外还需要对kernel/proc.c下的fork函数进行修改,因为一旦调用了trace系统调用,我们会在当前进程状态proc中修改mask掩码的设置,同时每次fork时也需要对相关的子进程同步相关的设置,一行代码的事。
我们需要修改kernel/syscall.c下的syscall方法使得其打印追踪信息。为了打印系统调用名称,需要额外创建字符串数组。
用户态声明设置
我们在user/user.h中加入新的系统调用,按照惯例,我们认为调用成功返回0,失败返回-1:
1 2 3 4 5 6 7 8 9 10 11 12 13 14 15 16 17 18 19 20 21 22 23 int fork (void ) ;int exit (int ) __attribute__ ((noreturn )) ;int wait (int *) ;int pipe (int *) ;int write (int , const void *, int ) ;int read (int , void *, int ) ;int close (int ) ;int kill (int ) ;int exec (char *, char **) ;int open (const char *, int ) ;int mknod (const char *, short , short ) ;int unlink (const char *) ;int fstat (int fd, struct stat*) ;int link (const char *, const char *) ;int mkdir (const char *) ;int chdir (const char *) ;int dup (int ) ;int getpid (void ) ;char * sbrk (int ) ;int sleep (int ) ;int uptime (void ) ;int trace (int ) ;
在user/usys.pl中,我们需要添加一条记录,通过该perl程序我们创建了进入内核态的入口:
1 2 3 4 5 6 7 8 9 10 11 12 13 14 15 16 17 18 19 20 21 22 23 24 25 26 27 28 29 30 31 32 33 34 35 36 37 38 39 print "# generated by usys.pl - do not edit\n" ;print "#include \"kernel/syscall.h\"\n" ;sub entry my $name = shift ; print ".global $name\n" ; print "${name} :\n" ; print " li a7, SYS_${name} \n" ; print " ecall\n" ; print " ret\n" ; } entry("fork" ); entry("exit" ); entry("wait" ); entry("pipe" ); entry("read" ); entry("write" ); entry("close" ); entry("kill" ); entry("exec" ); entry("open" ); entry("mknod" ); entry("unlink" ); entry("fstat" ); entry("link" ); entry("mkdir" ); entry("chdir" ); entry("dup" ); entry("getpid" ); entry("sbrk" ); entry("sleep" ); entry("uptime" ); entry("trace" );
另外记得在Makefile中的UPROGS添加trace,这里就不赘述了。
至此,用户态声明设置完毕。
内核态系统调用编号及映射设置
我们需要为新的trace系统调用开一个新的编号,在kernel/syscall.h中,顺延即可:
1 2 3 4 5 6 7 8 9 10 11 12 13 14 15 16 17 18 19 20 21 22 23 #define SYS_fork 1 #define SYS_exit 2 #define SYS_wait 3 #define SYS_pipe 4 #define SYS_read 5 #define SYS_kill 6 #define SYS_exec 7 #define SYS_fstat 8 #define SYS_chdir 9 #define SYS_dup 10 #define SYS_getpid 11 #define SYS_sbrk 12 #define SYS_sleep 13 #define SYS_uptime 14 #define SYS_open 15 #define SYS_write 16 #define SYS_mknod 17 #define SYS_unlink 18 #define SYS_link 19 #define SYS_mkdir 20 #define SYS_close 21 #define SYS_trace 22
另外在kernel/syscall.c中,我们需要完成trace系统调用的映射,sys_trace方法后面再补:
1
2
3
4
5
6
7
8
9
10
11
12
13
14
15
16
17
18
19
20
21
22
23
24
25
26
27
28
29
30
31
32
33
34
35
36
37
38
39
40
41
42
43
44
45
46
47
extern uint64 sys_chdir (void ) ;extern uint64 sys_close (void ) ;extern uint64 sys_dup (void ) ;extern uint64 sys_exec (void ) ;extern uint64 sys_exit (void ) ;extern uint64 sys_fork (void ) ;extern uint64 sys_fstat (void ) ;extern uint64 sys_getpid (void ) ;extern uint64 sys_kill (void ) ;extern uint64 sys_link (void ) ;extern uint64 sys_mkdir (void ) ;extern uint64 sys_mknod (void ) ;extern uint64 sys_open (void ) ;extern uint64 sys_pipe (void ) ;extern uint64 sys_read (void ) ;extern uint64 sys_sbrk (void ) ;extern uint64 sys_sleep (void ) ;extern uint64 sys_unlink (void ) ;extern uint64 sys_wait (void ) ;extern uint64 sys_write (void ) ;extern uint64 sys_uptime (void ) ;extern uint64 sys_trace (void ) ;static uint64 (*syscalls[]) (void ) = {[SYS_fork] sys_fork, [SYS_exit] sys_exit, [SYS_wait] sys_wait, [SYS_pipe] sys_pipe, [SYS_read] sys_read, [SYS_kill] sys_kill, [SYS_exec] sys_exec, [SYS_fstat] sys_fstat, [SYS_chdir] sys_chdir, [SYS_dup] sys_dup, [SYS_getpid] sys_getpid, [SYS_sbrk] sys_sbrk, [SYS_sleep] sys_sleep, [SYS_uptime] sys_uptime, [SYS_open] sys_open, [SYS_write] sys_write, [SYS_mknod] sys_mknod, [SYS_unlink] sys_unlink, [SYS_link] sys_link, [SYS_mkdir] sys_mkdir, [SYS_close] sys_close, [SYS_trace] sys_trace };
后续打印相关日志还需要一个字符串数组,我们也做成一一对应的关系,以便不时之需:
1
2
3
4
char *syscalls_name[23 ] = { "" , "fork" , "exit" , "wait" , "pipe" , "read" , "kill" , "exec" , "fstat" , "chdir" , "dup" , "getpid" , "sbrk" , "sleep" , "uptime" , "open" , "write" , "mknod" , "unlink" , "link" , "mkdir" , "close" , "trace" };
进程状态proc修改
首先要明确一点,trace只接受一个参数也就是掩码。调用trace的时候,我们对当前进程的状态proc进行修改,做上一个小小的标记mask,告诉自己这个mask就是当前进程需要追踪的系统调用集合。
后续该进程每次调用syscall使用任何系统调用的时候,我们都拿被调用的系统调用编号和状态proc中的标记mask进行比对,如果匹配,打印日志即可。
因此我们在kernel/proc.h中的proc结构体中加入这么一个变量mask,表示该进程后续需要追踪的系统调用集合:
1 2 3 4 5 6 7 8 9 10 11 12 13 14 15 16 17 18 19 20 21 22 23 24 25 struct proc { struct spinlock lock ; enum procstate state ; void *chan; int killed; int xstate; int pid; struct proc *parent ; uint64 kstack; uint64 sz; pagetable_t pagetable; struct trapframe *trapframe ; struct context context ; struct file *ofile [NOFILE ]; struct inode *cwd ; char name[16 ]; int mask; };
trace核心功能设置跟随着刚才的思路,在kernel/sysproc.c中,我们需要实现修改进程状态proc中的mask追踪掩码变量。我们在sys_trace中实现:
1
2
3
4
5
6
7
uint64 sys_trace (void ) { int mask; if (argint(0 , &mask) < 0 ) { return -1 ; } return trace(mask); }
而核心函数,我们在kernel/proc.c中实现即可,功能很简单,就是把当前进程的状态改一下:
1
2
3
4
5
int trace (int mask) { struct proc *p = p->mask = mask; return 0 ; }
需要注意的是,我们还需要在kernel/defs.h中加入声明,不然会报错:
1 2 3 4 5 6 7 8 9 10 11 12 13 14 15 16 17 18 19 20 21 22 23 24 int cpuid (void ) ;void exit (int ) ;int fork (void ) ;int growproc (int ) ;void proc_mapstacks (pagetable_t ) ;pagetable_t proc_pagetable (struct proc *) ;void proc_freepagetable (pagetable_t , uint64) ;int kill (int ) ;struct cpu* mycpu (void ) ;struct cpu* getmycpu (void ) ;struct proc* myproc () ;void procinit (void ) ;void scheduler (void ) __attribute__ ((noreturn )) ;void sched (void ) ;void sleep (void *, struct spinlock*) ;void userinit (void ) ;int wait (uint64) ;void wakeup (void *) ;void yield (void ) ;int either_copyout (int user_dst, uint64 dst, void *src, uint64 len) ;int either_copyin (void *dst, int user_src, uint64 src, uint64 len) ;void procdump (void ) ;int trace (int ) ;
fork功能修改fork的时候掩码信息要一并复制给子进程,没啥好说的… 见kernel/proc.c,加一行就好:
1 2 3 4 5 6 7 8 9 10 11 12 13 14 15 16 17 18 19 20 21 22 23 24 25 26 27 28 29 30 31 32 33 34 35 36 37 38 39 40 41 42 43 44 45 46 47 48 49 50 51 52 int fork (void ) { int i, pid; struct proc *np ; struct proc *p = if ((np = allocproc()) == 0 ){ return -1 ; } if (uvmcopy(p->pagetable, np->pagetable, p->sz) < 0 ){ freeproc(np); release(&np->lock); return -1 ; } np->sz = p->sz; *(np->trapframe) = *(p->trapframe); np->trapframe->a0 = 0 ; for (i = 0 ; i < NOFILE; i++) if (p->ofile[i]) np->ofile[i] = filedup(p->ofile[i]); np->cwd = idup(p->cwd); safestrcpy(np->name, p->name, sizeof (p->name)); np->mask = p->mask; pid = np->pid; release(&np->lock); acquire(&wait_lock); np->parent = p; release(&wait_lock); acquire(&np->lock); np->state = RUNNABLE; release(&np->lock); return pid; }
打印日志
根据提示和思路,我们需要对kernel/syscall.c下对syscall方法进行修改,我们知道该方法是根据a7寄存器对数据对号入座调用系统调用的,当p->trapframe->a0 = syscalls[num]();结束后,系统调用将返回值写到a0寄存器。在这之后,根据要求,我们就需要判断该系统调用与我们proc中的mask是否吻合,并进行打印等操作。
算是一个很简单的位运算操作,基操了:
1
2
3
4
5
6
7
8
9
10
11
12
13
14
15
16
17
18
void syscall (void ) { int num; struct proc *p = num = p->trapframe->a7; if (num > 0 && num < NELEM(syscalls) && syscalls[num]) { p->trapframe->a0 = syscalls[num](); if (p->mask >> num & 1 ) { printf ("%d: syscall %s -> %d\n" ,p->pid, syscalls_name[num], p->trapframe->a0); } } else { printf ("%d %s: unknown sys call %d\n" , p->pid, p->name, num); p->trapframe->a0 = -1 ; } }
刚才创建的字符串数组在这里用到了~
至此,trace系统调用的修改就完成了。
测试
就拿刚才的示例功能做测试好了。
运行trace 32 grep hello README和trace 2147483647 grep hello README结果为:
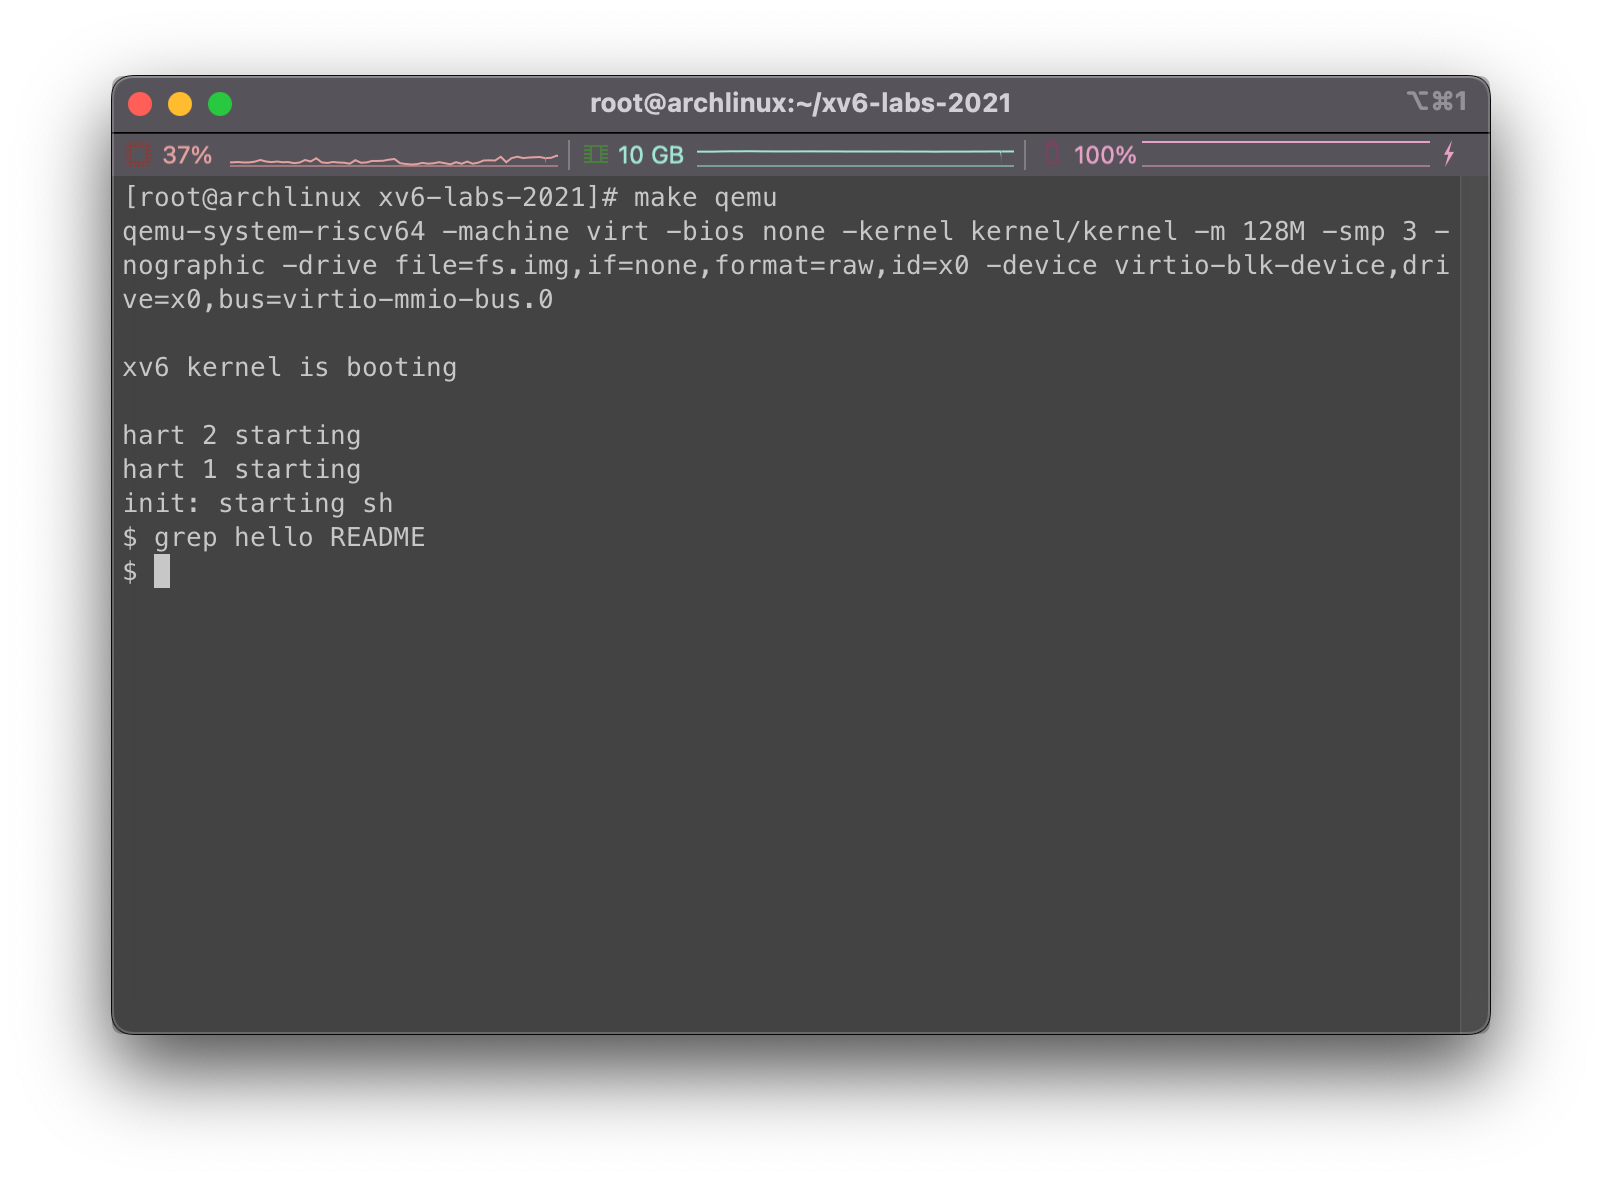
纯调用grep hello README,由于没设置掩码不会产生日志输出:
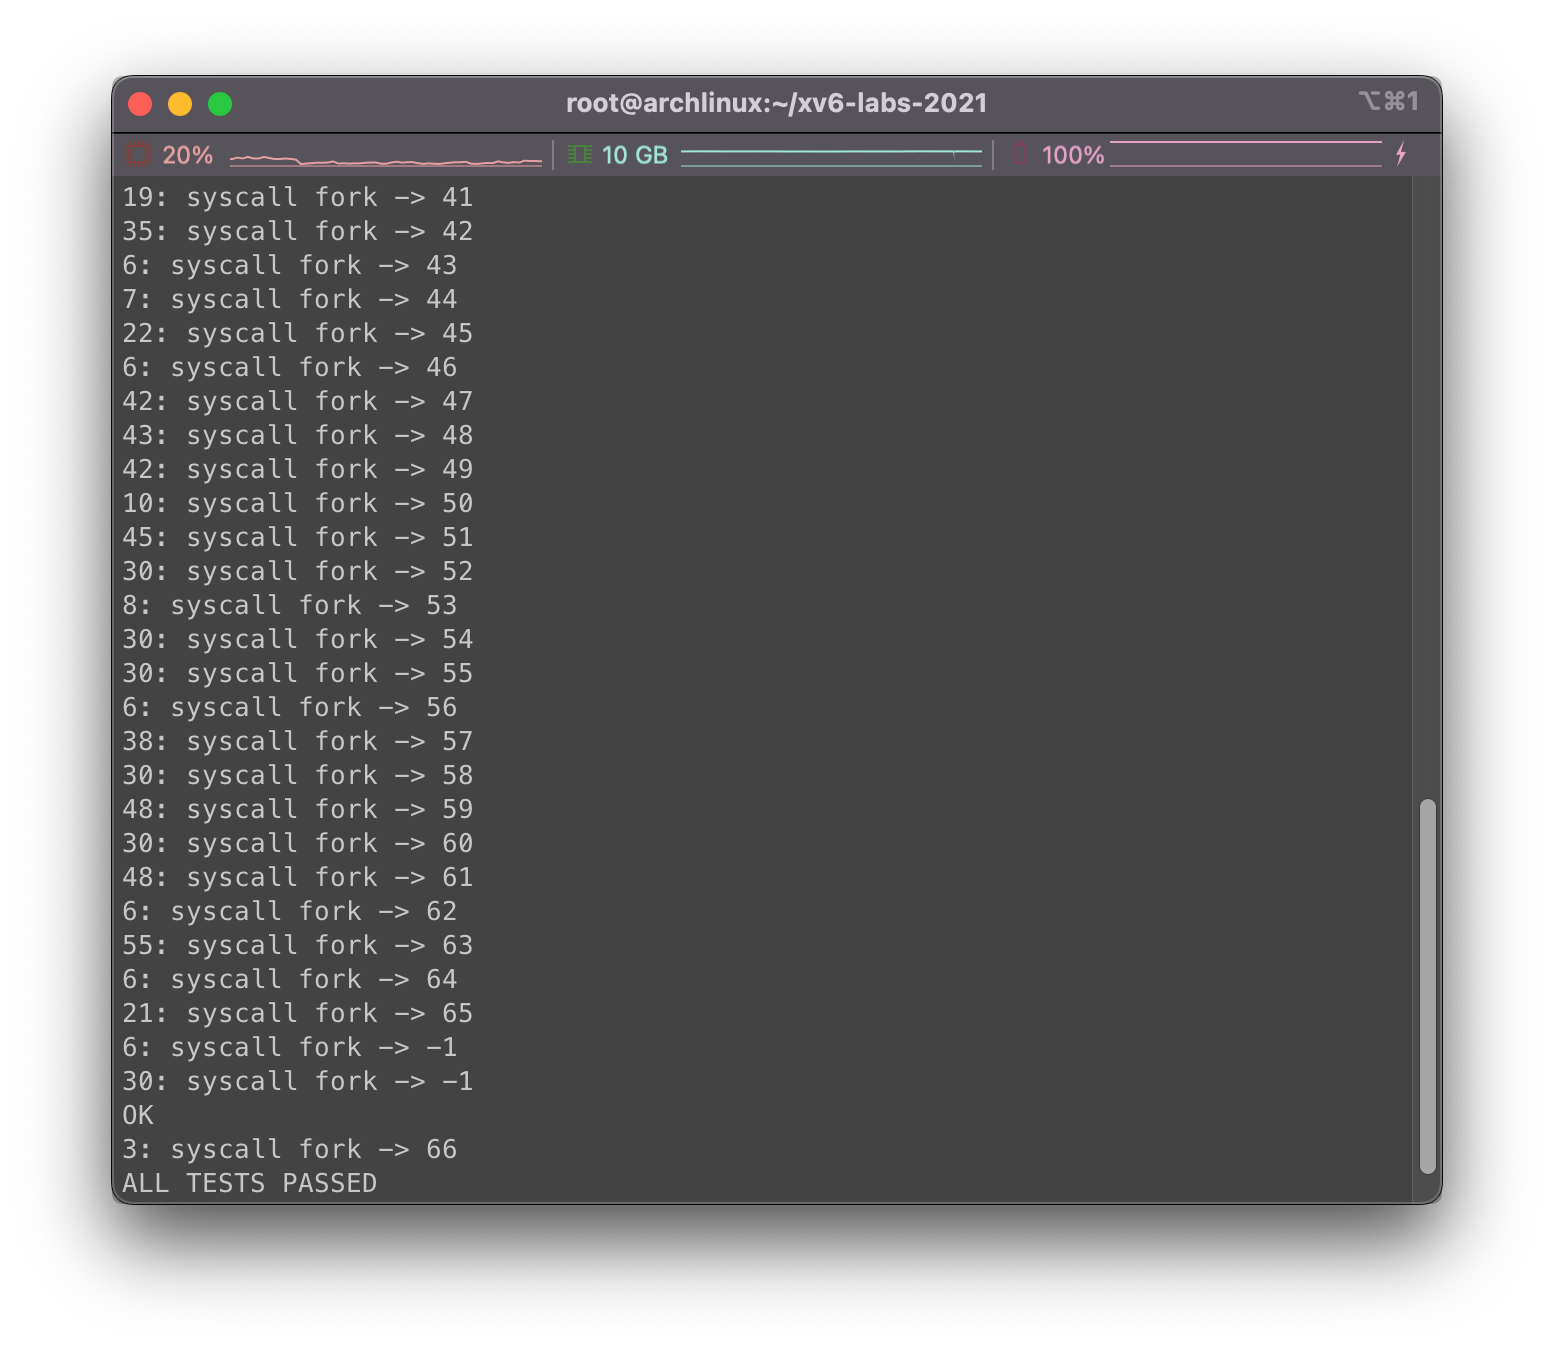
运行trace 2 usertests forkforkfork结果为:
目测没啥问题
实现系统调用sysinfo
要求和提示
在本部分中,我们将添加一个系统调用sysinfo,通过该系统调用我们将收集正在运行的系统的相关信息。在此系统调用中,我们将传入一个参数,即指向名为sysinfo结构体的指针,具体结构详见kernel/sysinfo.h:
1
2
3
4
struct sysinfo { uint64 freemem; uint64 nproc; };
通过调用sysinfo系统调用,我们将指针指向的结构体内部进行填充,其中freemem表示空闲内存的字节数,nproc表示进程状态不为UNUSED的进程数量。
为了测试相关功能,本次Lab创建了一个user/sysinfotest.c的UNIX程序以供测试,其中对待实现的sysinfo系统调用进行了多次使用。
相关提示:
将$U/_sysinfotest加入到Makefile的UPROGS中。
直接运行make qemu会导致user/sysinfotest.c无法被编译,原因同上个系统调用。需要注意的是在user/user.h中声明系统调用时,还需要先声明结构体sysinfo(不然自然是没法通过的):
1
2
struct sysinfo ;int sysinfo (struct sysinfo *) ;
完成了这些准备工作再考虑实现内核代码中的系统调用。
系统调用sysinfo需要复制结构体struct sysinfo到用户空间。我们需要学会使用copyout函数,使用样例详情kernel/sysfile.c下的sys_fstat函数和kernel/file.c下的filestat函数。
为了确定空闲内存空间的大小,我们需要在kernel/kalloc.c中添加函数。
为了确定进程的数量,我们需要在kernel/proc.c中添加函数。
用户态声明设置
我们需要在用户态下声明系统调用,首先考虑在user/user.h中添加声明。根据提示,不要忘记提前声明sysinfo结构体:
1
2
3
4
5
6
7
8
9
10
11
12
13
14
15
16
17
18
19
20
21
22
23
24
25
26
27
28
struct stat ;struct rtcdate ;struct sysinfo ;int fork (void ) ;int exit (int ) __attribute__ ((noreturn )) ;int wait (int *) ;int pipe (int *) ;int write (int , const void *, int ) ;int read (int , void *, int ) ;int close (int ) ;int kill (int ) ;int exec (char *, char **) ;int open (const char *, int ) ;int mknod (const char *, short , short ) ;int unlink (const char *) ;int fstat (int fd, struct stat*) ;int link (const char *, const char *) ;int mkdir (const char *) ;int chdir (const char *) ;int dup (int ) ;int getpid (void ) ;char * sbrk (int ) ;int sleep (int ) ;int uptime (void ) ;int trace (int ) ;int sysinfo (struct sysinfo *) ;
在user/usys.pl中,我们需要添加一条记录,通过该perl程序我们创建了进入内核态的入口:
1 2 3 4 5 6 7 8 9 10 11 12 13 14 15 16 17 18 19 20 21 22 23 24 25 26 27 28 29 30 31 32 33 34 35 36 37 38 39 40 print "# generated by usys.pl - do not edit\n" ;print "#include \"kernel/syscall.h\"\n" ;sub entry my $name = shift ; print ".global $name\n" ; print "${name} :\n" ; print " li a7, SYS_${name} \n" ; print " ecall\n" ; print " ret\n" ; } entry("fork" ); entry("exit" ); entry("wait" ); entry("pipe" ); entry("read" ); entry("write" ); entry("close" ); entry("kill" ); entry("exec" ); entry("open" ); entry("mknod" ); entry("unlink" ); entry("fstat" ); entry("link" ); entry("mkdir" ); entry("chdir" ); entry("dup" ); entry("getpid" ); entry("sbrk" ); entry("sleep" ); entry("uptime" ); entry("trace" ); entry("sysinfo" );
最后,记得在 Makefile 中的 UPROGS 添加 sysinfotest,这里就不赘述了。
内核态系统调用编号及映射设置
我们为新的sysinfo系统调用开新的编号,在kernel/syscall.h中顺延即可:
1 2 3 4 5 6 7 8 9 10 11 12 13 14 15 16 17 18 19 20 21 22 23 24 #define SYS_fork 1 #define SYS_exit 2 #define SYS_wait 3 #define SYS_pipe 4 #define SYS_read 5 #define SYS_kill 6 #define SYS_exec 7 #define SYS_fstat 8 #define SYS_chdir 9 #define SYS_dup 10 #define SYS_getpid 11 #define SYS_sbrk 12 #define SYS_sleep 13 #define SYS_uptime 14 #define SYS_open 15 #define SYS_write 16 #define SYS_mknod 17 #define SYS_unlink 18 #define SYS_link 19 #define SYS_mkdir 20 #define SYS_close 21 #define SYS_trace 22 #define SYS_sysinfo 23
另外在kernel/syscall.c中补全对应的编号和执行函数的映射,同时补全syscalls_name字符串数组:
1
2
3
4
5
6
7
8
9
10
11
12
13
14
15
16
17
18
19
20
21
22
23
24
25
26
27
28
29
30
31
32
33
34
35
36
37
38
39
extern uint64 sys_chdir (void ) ;extern uint64 sys_close (void ) ;extern uint64 sys_dup (void ) ;extern uint64 sys_exec (void ) ;extern uint64 sys_exit (void ) ;extern uint64 sys_fork (void ) ;extern uint64 sys_fstat (void ) ;extern uint64 sys_getpid (void ) ;extern uint64 sys_kill (void ) ;extern uint64 sys_link (void ) ;extern uint64 sys_mkdir (void ) ;extern uint64 sys_mknod (void ) ;extern uint64 sys_open (void ) ;extern uint64 sys_pipe (void ) ;extern uint64 sys_read (void ) ;extern uint64 sys_sbrk (void ) ;extern uint64 sys_sleep (void ) ;extern uint64 sys_unlink (void ) ;extern uint64 sys_wait (void ) ;extern uint64 sys_write (void ) ;extern uint64 sys_uptime (void ) ;extern uint64 sys_trace (void ) ;extern uint64 sys_sysinfo (void ) ;static uint64 (*syscalls[]) (void ) = { [SYS_fork] sys_fork, [SYS_exit] sys_exit, [SYS_wait] sys_wait, [SYS_pipe] sys_pipe, [SYS_read] sys_read, [SYS_kill] sys_kill, [SYS_exec] sys_exec, [SYS_fstat] sys_fstat, [SYS_chdir] sys_chdir, [SYS_dup] sys_dup, [SYS_getpid] sys_getpid, [SYS_sbrk] sys_sbrk, [SYS_sleep] sys_sleep, [SYS_uptime] sys_uptime, [SYS_open] sys_open, [SYS_write] sys_write, [SYS_mknod] sys_mknod, [SYS_unlink] sys_unlink, [SYS_link] sys_link, [SYS_mkdir] sys_mkdir, [SYS_close] sys_close, [SYS_trace] sys_trace, [SYS_sysinfo] sys_sysinfo}; char *syscalls_name[24 ] = {"" , "fork" , "exit" , "wait" , "pipe" , "read" , "kill" , "exec" , "fstat" , "chdir" , "dup" , "getpid" , "sbrk" , "sleep" , "uptime" , "open" , "write" , "mknod" , "unlink" , "link" , "mkdir" , "close" , "trace" , "sysinfo" };
实现内存查询功能
根据提示,我们需要在kernel/kalloc.c下,实现一个空闲内存大小的查找功能。
大致浏览kalloc.c文件,不难发现,操作系统将内存地址从end到PHYSTOP进行初始化,以内存页(一个页大小PGSIZE即4096字节)为基本单位,并维护了一个空闲链表kmem(刚做过Malloc Lab狂喜):
1
2
3
4
5
6
7
8
struct run { struct run *next ; }; struct { struct spinlock lock ; struct run *freelist ; } kmem;
那么我们的任务也就很简单了,我们遍历空闲链表,同时进行计数,确定空闲的内存块数量。考虑到并发编程问题,可能要在操作前进行加锁,代码如下:
1
2
3
4
5
6
7
8
9
10
11
12
uint64 getfreemem (void ) { struct run *r ; uint64 count = 0 ; acquire(&kmem.lock); r = kmem.freelist; while (r) { count++; r = r->next; } release(&kmem.lock); return count * PGSIZE; }
记得在kernel/defs.h中声明一下这个函数:
1 2 3 4 5 void * kalloc (void ) ;void kfree (void *) ;void kinit (void ) ;uint64 getfreemem (void ) ;
实现进程数量统计功能
根据提示,我们需要在kernel/proc.c中添加函数,实现进程数量统计的功能。
我们查看相关的代码,首先印入眼帘的就是这个保存进程状态的数组:
1 struct proc proc [NPROC ];
至于proc是什么,在前一个系统调用作业中也提及了,他保存了进程的状态信息,详见kernel/proic.h,不难发现其中也包含状态信息state:
1
2
3
4
5
6
7
8
9
10
11
12
13
14
15
16
17
18
19
20
21
22
23
24
25
26
27
enum procstate {struct proc { struct spinlock lock ; enum procstate state ; void *chan; int killed; int xstate; int pid; struct proc *parent ; uint64 kstack; uint64 sz; pagetable_t pagetable; struct trapframe *trapframe ; struct context context ; struct file *ofile [NOFILE ]; struct inode *cwd ; char name[16 ]; int mask; };
而我们恰好需要统计状态不为UNUSED状态的进程数量,因此只需要遍历进程状态数组,查询各个进程的状态。考虑到并发编程的需求,我们也需要对进程状态的锁lock进行请求:
1
2
3
4
5
6
7
8
9
10
11
12
int procnum (void ) { struct proc *p ; int count = 0 ; for (p = proc; p < &proc[NPROC]; p++) { acquire(&p->lock); if (p->state != UNUSED){ count++; } release(&p->lock); } return count; }
记得在kernel/defs.h中声明一下这个函数:
1 2 3 4 5 6 7 8 9 10 11 12 13 14 15 16 17 18 19 20 21 22 23 24 25 int cpuid (void ) ;void exit (int ) ;int fork (void ) ;int growproc (int ) ;void proc_mapstacks (pagetable_t ) ;pagetable_t proc_pagetable (struct proc *) ;void proc_freepagetable (pagetable_t , uint64) ;int kill (int ) ;struct cpu* mycpu (void ) ;struct cpu* getmycpu (void ) ;struct proc* myproc () ;void procinit (void ) ;void scheduler (void ) __attribute__ ((noreturn )) ;void sched (void ) ;void sleep (void *, struct spinlock*) ;void userinit (void ) ;int wait (uint64) ;void wakeup (void *) ;void yield (void ) ;int either_copyout (int user_dst, uint64 dst, void *src, uint64 len) ;int either_copyin (void *dst, int user_src, uint64 src, uint64 len) ;void procdump (void ) ;int trace (int ) ;int procnum (void ) ;
sysinfo核心功能设置我们需要根据在kernel/syscall.c中添加的系统调用编号-执行函数映射关系,在kernel/sysproc.c中添加执行函数sys_sysinfo。注意到需要在sysproc.c中引用sysinfo.h,不然无法识别结构体sysinfo。
根据题目提示,在这里我们主要遇到的最大难点是使用copyout将内核态的结构体sysinfo拷贝到用户态。我们只需要传递进程的页表、要复制到的地址和对应的结构体数据给copyout函数即可。
代码如下:
1
2
3
4
5
6
7
8
9
10
11
12
13
14
15
16
uint64 sys_sysinfo (void ) { struct sysinfo info ; struct proc *p ; uint64 addr; if (argaddr(0 , &addr) < 0 ) { return -1 ; } p = myproc(); info.freemem = getfreemem(); info.nproc = procnum(); if (copyout(p->pagetable, addr, (char *)&info, sizeof (info)) < 0 ){ return -1 ; } return 0 ; }
测试
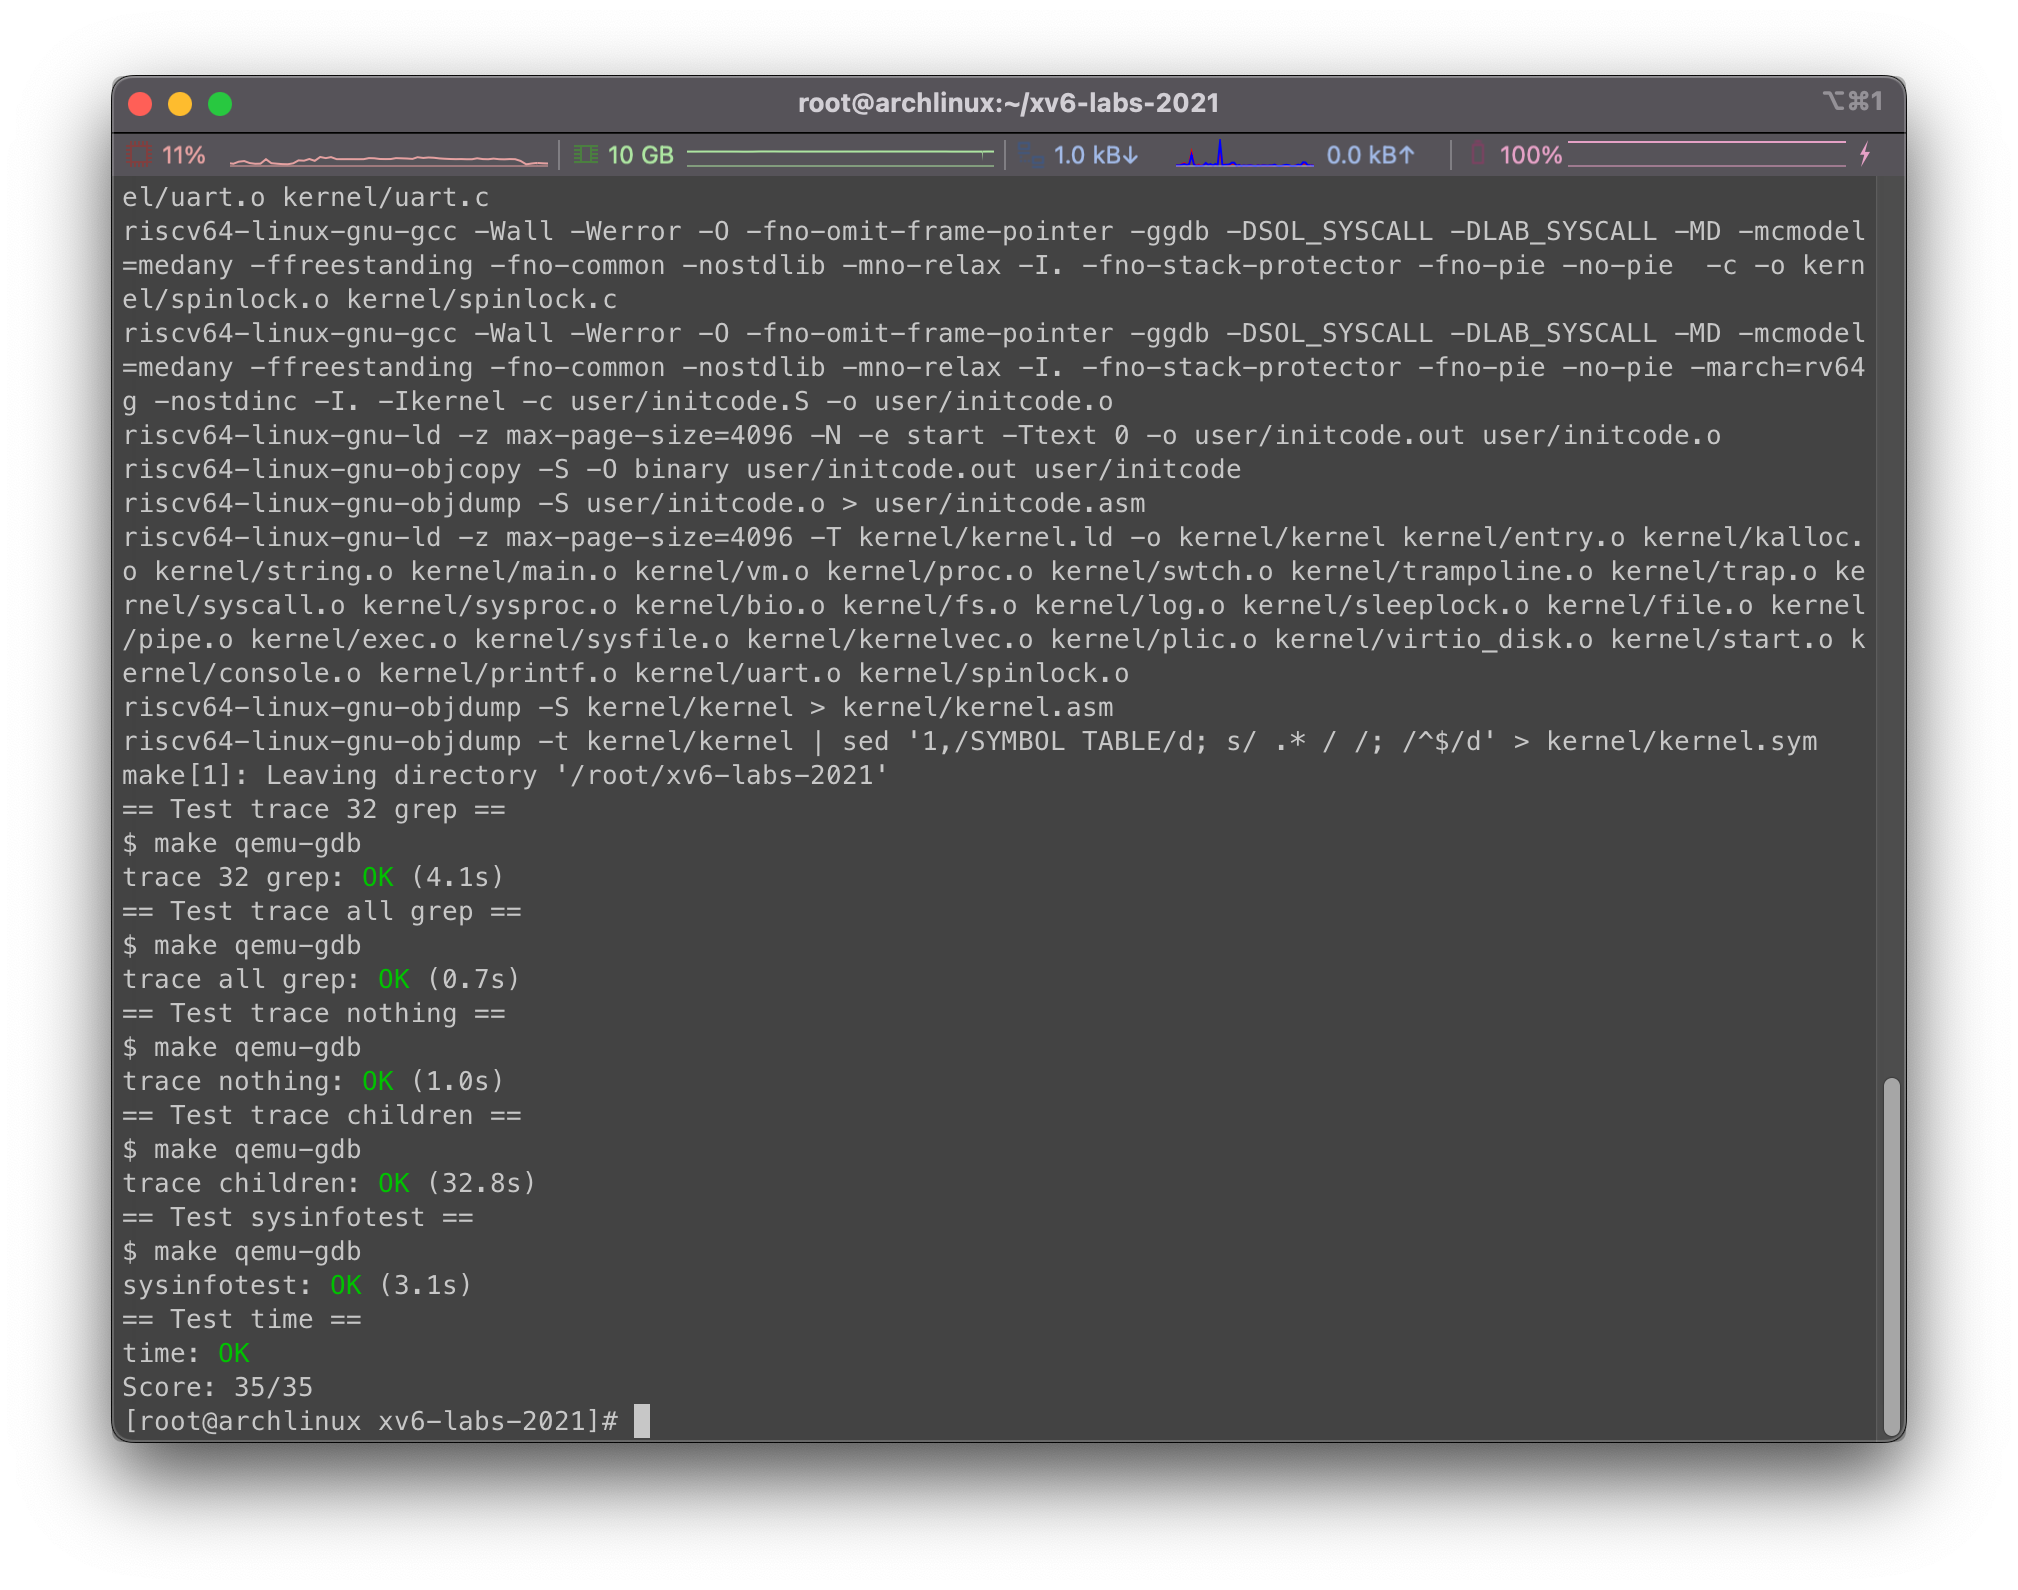
目测是可以通过的:
总结
现在我们对整个Lab进行测试,首先有几点需要注意:
好了,接下来是测试结果:
完美,这次的Lab就这样结束了,感觉不错… 下次继续