课程相关的资源、视频和教材见Lab util: Unix utilities开头。

最近一段时间倒是没有很着急去处理这个Lab,而是花了更多时间跟着网课去看各种论文,感觉像是追番一样,越看越上瘾,着实感觉脑洞大开…

在这个Lab中,我们要实现mmapmunmap来允许UNIX程序对其地址空间进行详细控制,它们可以用来在进程之间共享内存,将文件映射到进程的地址空间中,并作为用户级页面错误方案的一部分,如Lecture中讨论的垃圾收集GC算法。

准备

对应课程

本次的作业是Lab Mmap,我们将在xv6中实现mmapmunmap,但是我们主要关注内存映射的文件。

讲道理这次也不知道应该算看哪里hhh,大概是Lecture 17,也就是B站课程的P16吧,这里介绍了我们利用用户空间内的页表可以做出的各种骚操作。

系统环境

使用Arch Linux虚拟机作为实验环境…

环境依赖配置,编译使用make qemu等,如遇到问题,见第一次的Lab util: Unix utilities

使用准备

参考本次的实验说明书: Lab mmap: Mmap

从仓库clone下来课程文件:

1
git clone git://g.csail.mit.edu/xv6-labs-2021

切换到本次作业的mmap分支即可:

1
2
cd xv6-labs-2021
git checkout mmap

在作业完成后可以使用make grade对所有结果进行评分。

题目

实现mmap内存映射

要求和提示

我们可以使用man 2 mmap查看mmapman手册:

1
2
void *mmap(void *addr, size_t length, int prot, int flags,
int fd, off_t offset);

mmap可以以多种方式调用,但是在这次Lab中我们只需要它实现内存映射文件的部分功能。

  • 我们可以假设参数addr永远是0,即由内核决定映射文件的虚拟地址。mmap将返回该地址,如果失败则应该返回0xffffffffffffffff
  • 参数length是要映射的字节数,但是他可能和文件的长度不一致。
  • 参数prot表示内存是否应该被映射为可读、可写和可执行,你可以假设protPROT_READ或者PROT_WRITE或者两者都是。
  • 参数flags要么是MAP_SHARED表示对映射的内存修改应该被写回文件,要么是MAP_PRIVATE表示不应该写回文件。我们不必在flags中实现任何其他的标志位。
  • 参数fd表示了要映射的文件的描述符。我们可以假定offset为零(即要映射的文件的起始点)

如果映射同一MAP_SHARED文件的进程不共享物理内存页,也是可以的。

munmap(addr, length)应该删除指定范围内的mmap映射。如果进程目前已经修改了内存并将其映射为MAP_SHARED,那么我们应该先将修改内容写入文件。当我们调用munmap时可能只覆盖被映射区域的一部分,我们可以假设的是,这块区域可以在映射区域的头部、尾部,但是不会在区域的中间位置挖出一个洞。

在这个Lab中,我们要通过的测试程序为mmaptest,我们只需要实现满足要求的mmapmunmap功能,以使得mmaptest可以顺利通过。mmaptest不要求的mmap特性,我们不必实现。

如果成功通过测试,如下为成功输出样例:

1
2
3
4
5
6
7
8
9
10
11
12
13
14
15
16
17
18
19
20
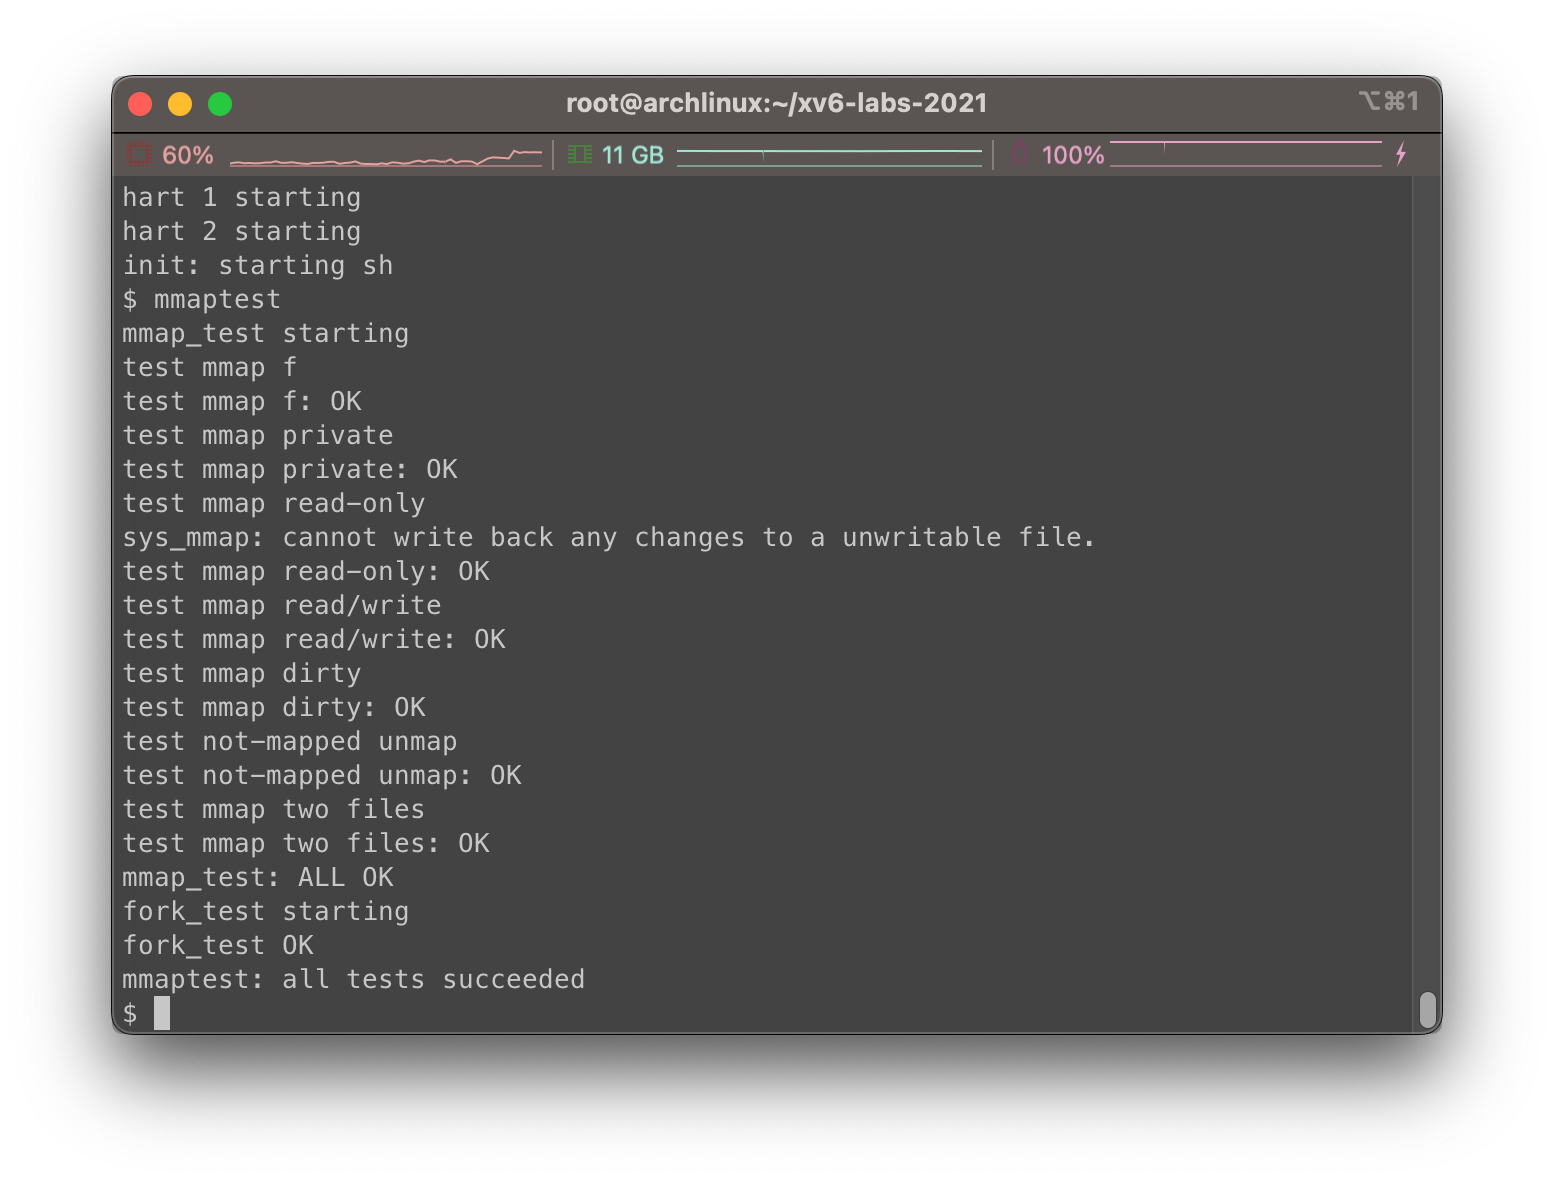
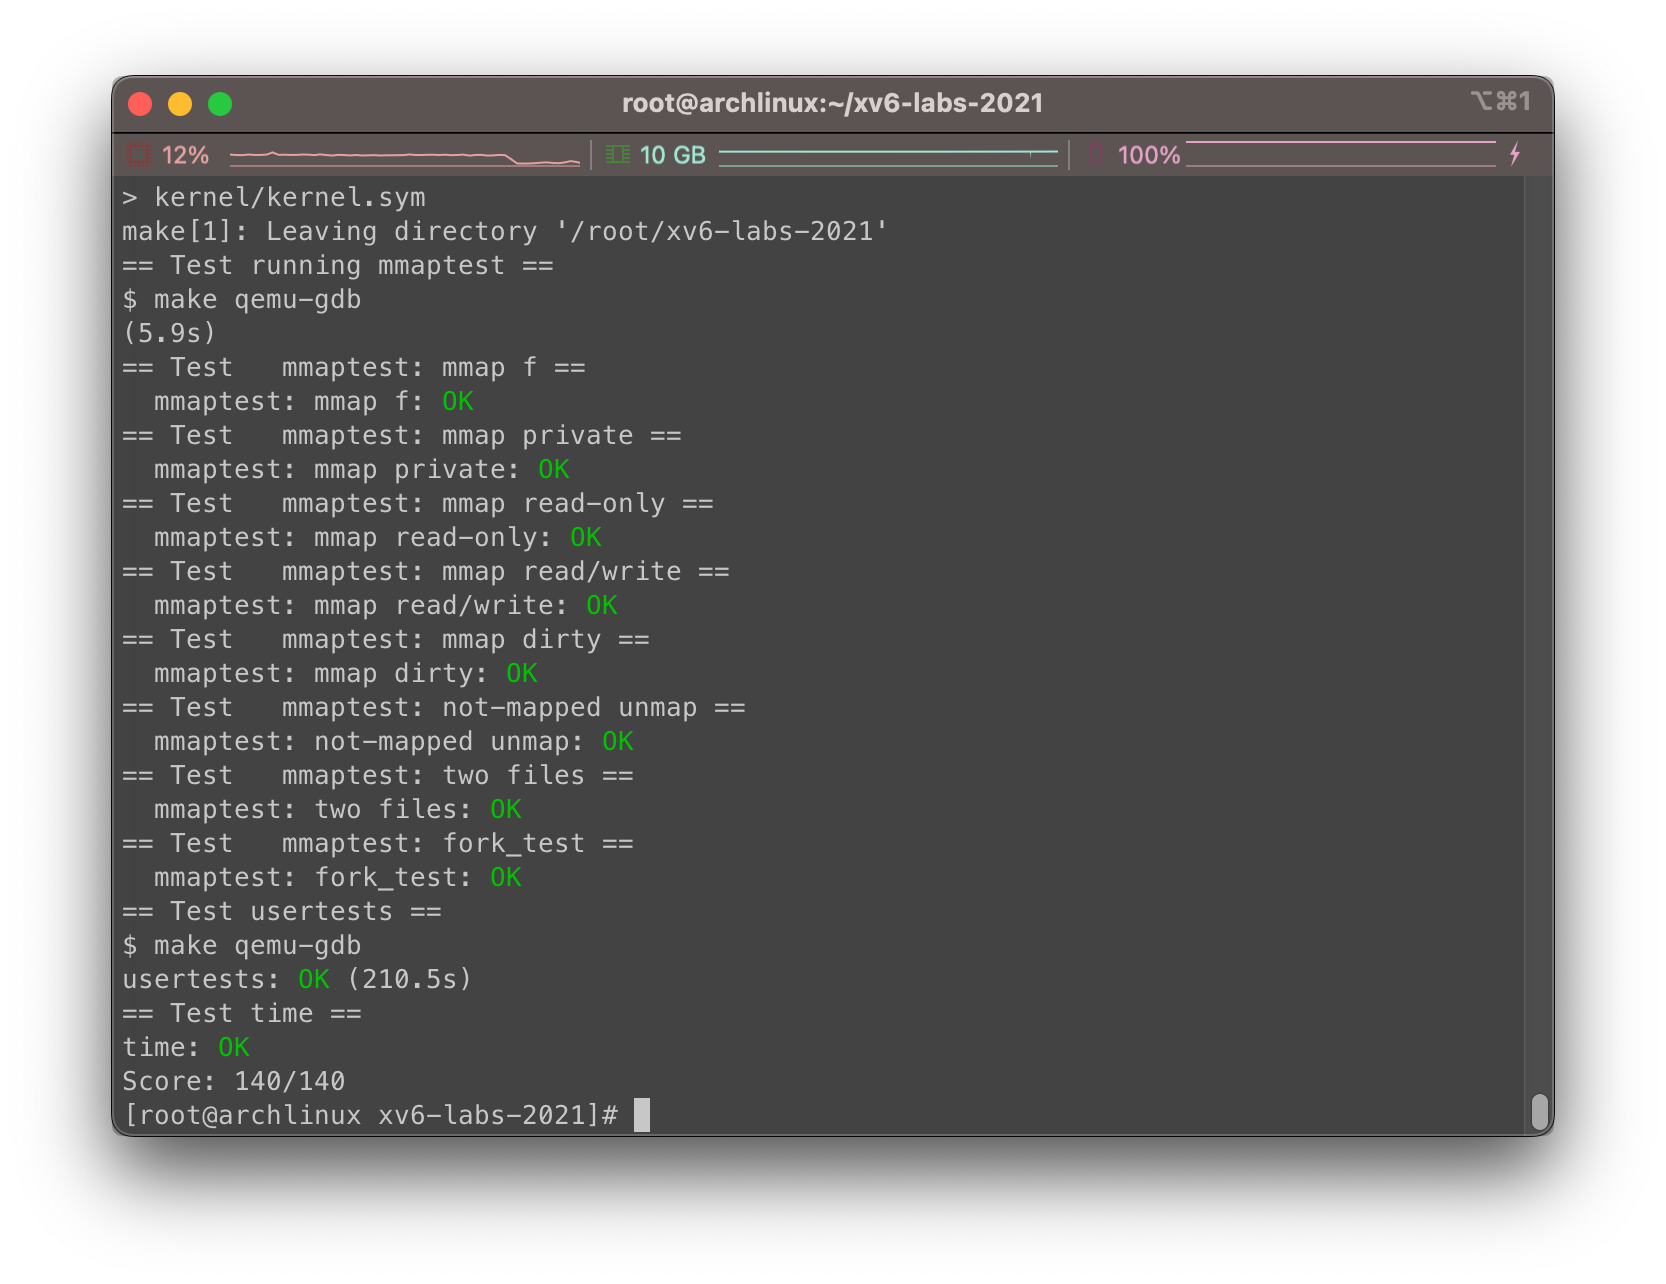
$ mmaptest
mmap_test starting
test mmap f
test mmap f: OK
test mmap private
test mmap private: OK
test mmap read-only
test mmap read-only: OK
test mmap read/write
test mmap read/write: OK
test mmap dirty
test mmap dirty: OK
test not-mapped unmap
test not-mapped unmap: OK
test mmap two files
test mmap two files: OK
mmap_test: ALL OK
fork_test starting
fork_test OK
mmaptest: all tests succeeded

相关提示:

  • 首先我们需要添加mmapmunmap系统调用,并将_mmaptest加入到Makefile下的UPROGS中,不记得的还是去看下Lab Syscall吧… 相关的标志位信息例如PROT_READ等已经定义在了kernel/fcntl.h中。至此,如果我们尝试运行mmaptest,第一次mmap调用时会直接失败。
  • 我们需要对页表进行懒加载,并应对可能发生的缺页中断。也就是说,mmap不应该分配物理内存或者读取文件。相反的,我们应该在usertrap下的缺页中断处理程序下做这些事情。懒加载的一大好处,就是可以确保大文件的mmap足够快速,并且使得加载一个比物理内存更大的文件成为可能。
  • 我们需要追踪mmap为每个进程映射了什么,为此我们在Lecture15中引入了虚拟内存区域(VMA)的概念,VMA将记录mmap创建的整块虚拟内存范围的地址、长度、权限以及文件等。由于xv6的内核中没有内存分配器,声明一个固定大小的VMA数组,并根据需要从数组中进行分配也是可以的,大小取16即可。
  • 在实现mmap的过程中,我们需要在进程的地址空间中找到一个未使用的区域来映射文件,并在进程的映射区域表中加入VMA。VMA中应该包含指向映射文件对应结构体struct file的指针,同时mmap应该增加文件的引用计数,以便在文件关闭时结构体不会消失(提示:请参阅filedup)。至此,如果我们尝试运行mmaptest,第一次mmap操作应该会成功,但是第一次访问被mmap的内存将导致缺页中断并终止mmaptest
  • 我们需要添加代码来在mmap过的区域中产生缺页中断,以此来进行物理内存页的分配,将4096字节的相关文件数据读入对应内存页面,并将其映射到对应的内存空间。我们需要使用readi来读取文件,并传入偏移量参数(记得对readi操作对inode节点进行加锁解锁)。不要忘记在对应页面上设置正确的权限。至此,如果我们尝试运行mmaptest,程序可以成功达到第一个munmap的位置。
  • 在实现munmap的过程中,我们需要找到对应地址范围内的VMA,并取消映射指定的页面(提示:使用uvmunmap)。如果munmap删除了先前mmap的所有页面,它应该减少相应结构体struct file的引用计数。如果未映射的页面已被修改,并且文件映射时设置了MAP_SHARED标志,我们需要将页面写回文件。可以参考filewrite相关代码风格。
  • 理想情况下,我们的实现只需要将程序实际修改的MAP_SHARED页面写回即可。在RISCV中其页表PTE上的脏位(D)表示了当前页面是否被写过了。然而,mmaptest并不检查非脏页是否回写,因此偷个懒不看脏位直接默认写回也是可以接受的。
  • 我们需要修改exit将进程的已映射区域取消映射,就像调用了munmap一样。至此,如果我们尝试运行mmaptestmmap_test应该通过,但可能不会通过fork_test
  • 我们需要修改fork以确保子进程具有与父进程相同的映射区域。不要忘记增加VMA的struct file的引用计数。在子进程的缺页中断处理程序中,可以直接分配新的物理页面,而不是与父进程共享页面。显然后者是更好的实现,但是需要更多工作。至此,如果我们尝试运行mmaptest,应该通过mmap_testfork_test

系统调用配置

这里还是一些经常提到的系统调用配置… 记不得的可以再去过过Lab Syscall…

这次我们要配置的是mmapmunmap两个系统调用,首先,我们去user/usys.pl中注册新的系统调用:

1
2
3
4
5
6
7
8
9
10
11
12
13
14
15
16
17
18
19
20
21
22
23
24
25
26
27
28
29
30
31
32
33
34
35
36
37
38
39
40
#!/usr/bin/perl -w

# Generate usys.S, the stubs for syscalls.

print "# generated by usys.pl - do not edit\n";

print "#include \"kernel/syscall.h\"\n";

sub entry {
my $name = shift;
print ".global $name\n";
print "${name}:\n";
print " li a7, SYS_${name}\n";
print " ecall\n";
print " ret\n";
}

entry("fork");
entry("exit");
entry("wait");
entry("pipe");
entry("read");
entry("write");
entry("close");
entry("kill");
entry("exec");
entry("open");
entry("mknod");
entry("unlink");
entry("fstat");
entry("link");
entry("mkdir");
entry("chdir");
entry("dup");
entry("getpid");
entry("sbrk");
entry("sleep");
entry("uptime");
entry("mmap");
entry("munmap");

然后在user/user.h 中在系统调用部分进行声明:

1
2
3
4
5
6
7
8
9
10
11
12
13
14
15
16
17
18
19
20
21
22
23
24
// system calls
int fork(void);
int exit(int) __attribute__((noreturn));
int wait(int*);
int pipe(int*);
int write(int, const void*, int);
int read(int, void*, int);
int close(int);
int kill(int);
int exec(char*, char**);
int open(const char*, int);
int mknod(const char*, short, short);
int unlink(const char*);
int fstat(int fd, struct stat*);
int link(const char*, const char*);
int mkdir(const char*);
int chdir(const char*);
int dup(int);
int getpid(void);
char* sbrk(int);
int sleep(int);
int uptime(void);
void* mmap(void*, int, int, int, int, int);
int munmap(void*, int);

我们还要在kernel/syscall.h中添加新的系统调用编号:

1
2
3
4
5
6
7
8
9
10
11
12
13
14
15
16
17
18
19
20
21
22
23
24
// System call numbers
#define SYS_fork 1
#define SYS_exit 2
#define SYS_wait 3
#define SYS_pipe 4
#define SYS_read 5
#define SYS_kill 6
#define SYS_exec 7
#define SYS_fstat 8
#define SYS_chdir 9
#define SYS_dup 10
#define SYS_getpid 11
#define SYS_sbrk 12
#define SYS_sleep 13
#define SYS_uptime 14
#define SYS_open 15
#define SYS_write 16
#define SYS_mknod 17
#define SYS_unlink 18
#define SYS_link 19
#define SYS_mkdir 20
#define SYS_close 21
#define SYS_mmap 22
#define SYS_munmap 23

并在kernel/syscall.c中的syscalls表中添加新的映射关系,指向需要执行的函数:

1
2
3
4
5
6
7
8
9
10
11
12
13
14
15
16
17
18
19
20
21
22
23
24
25
26
27
28
29
30
31
32
33
34
35
36
37
38
39
40
41
42
43
44
45
46
47
48
49
extern uint64 sys_chdir(void);
extern uint64 sys_close(void);
extern uint64 sys_dup(void);
extern uint64 sys_exec(void);
extern uint64 sys_exit(void);
extern uint64 sys_fork(void);
extern uint64 sys_fstat(void);
extern uint64 sys_getpid(void);
extern uint64 sys_kill(void);
extern uint64 sys_link(void);
extern uint64 sys_mkdir(void);
extern uint64 sys_mknod(void);
extern uint64 sys_open(void);
extern uint64 sys_pipe(void);
extern uint64 sys_read(void);
extern uint64 sys_sbrk(void);
extern uint64 sys_sleep(void);
extern uint64 sys_unlink(void);
extern uint64 sys_wait(void);
extern uint64 sys_write(void);
extern uint64 sys_uptime(void);
extern uint64 sys_mmap(void);
extern uint64 sys_munmap(void);

static uint64 (*syscalls[])(void) = {
[SYS_fork] sys_fork,
[SYS_exit] sys_exit,
[SYS_wait] sys_wait,
[SYS_pipe] sys_pipe,
[SYS_read] sys_read,
[SYS_kill] sys_kill,
[SYS_exec] sys_exec,
[SYS_fstat] sys_fstat,
[SYS_chdir] sys_chdir,
[SYS_dup] sys_dup,
[SYS_getpid] sys_getpid,
[SYS_sbrk] sys_sbrk,
[SYS_sleep] sys_sleep,
[SYS_uptime] sys_uptime,
[SYS_open] sys_open,
[SYS_write] sys_write,
[SYS_mknod] sys_mknod,
[SYS_unlink] sys_unlink,
[SYS_link] sys_link,
[SYS_mkdir] sys_mkdir,
[SYS_close] sys_close,
[SYS_mmap] sys_mmap,
[SYS_munmap] sys_munmap,
};

之后我们就差在kernel/sysfile.c下加入一个名字叫做sys_mmapsys_munmap的实现函数了。

另外记得把mmaptest添加在主目录的Makefile里面:

1
2
3
4
5
6
7
8
9
10
11
12
13
14
15
16
17
18
UPROGS=\
$U/_cat\
$U/_echo\
$U/_forktest\
$U/_grep\
$U/_init\
$U/_kill\
$U/_ln\
$U/_ls\
$U/_mkdir\
$U/_rm\
$U/_sh\
$U/_stressfs\
$U/_usertests\
$U/_grind\
$U/_wc\
$U/_zombie\
$U/_mmaptest\

VMA结构体定义

根据上面的提示,我们首先需要为每次mmap映射的一整段内存区域设置一个VMA,在每个进程中我们假定最多可以使用16个VMA。在每个VMA中需要包括一些mmap的基本属性,例如映射的虚拟地址开始位置、长度、标志位、映射文件及偏移量等信息。

因此我们在kernel/proc.h中加入如下代码:

1
2
3
4
5
6
7
8
9
10
11
12
13
14
15
16
17
18
19
20
21
22
23
24
25
26
27
28
29
30
31
32
33
34
35
36
37
38
39
#define NVMA         16    // maximum number of vma in a process
// VMA state
struct vma{
int used;
uint64 addr; // start va addr of the current vma
uint len; // vma length
uint prot; // memory protection of the mapping
uint flags; // whether updates are carried through to the underlying file
struct file *f; // target file
uint offset; // map starts at offset in the file
}

enum procstate { UNUSED, USED, SLEEPING, RUNNABLE, RUNNING, ZOMBIE };

// Per-process state
struct proc {
struct spinlock lock;

// p->lock must be held when using these:
enum procstate state; // Process state
void *chan; // If non-zero, sleeping on chan
int killed; // If non-zero, have been killed
int xstate; // Exit status to be returned to parent's wait
int pid; // Process ID

// wait_lock must be held when using this:
struct proc *parent; // Parent process

// these are private to the process, so p->lock need not be held.
uint64 kstack; // Virtual address of kernel stack
uint64 sz; // Size of process memory (bytes)
pagetable_t pagetable; // User page table
struct trapframe *trapframe; // data page for trampoline.S
struct context context; // swtch() here to run process
struct file *ofile[NOFILE]; // Open files
struct inode *cwd; // Current directory
struct vma vma[NVMA]; // Table of mapped regions
char name[16]; // Process name (debugging)
};

mmap映射函数实现

根据提示,我们只需要对页面进行懒加载,我们需要将mmap产生的相关参数写入到VMA中。由于是懒加载,在这一步中我们不需要对页表映射进行设置,而是任由用户线程访问地址产生缺页中断。

很明显这里的一大难点是如何处理mmap在用户空间的映射位置,根据刚才的提示和要求,addr参数默认为0,意味着内核需要自己决定用户空间的地址。为了尽量使得mmap的文件使用的地址空间不要和进程所使用的地址空间产生冲突,虚拟地址设置到尽可能高的位置,也就是刚好在 trapframe 下面。

根据提示,不要忘记使用filedup增加文件的引用计数,以便在文件关闭时结构体不会消失。

因此我们在kernel/sysfile.c下实现sys_mmap()核心函数:

1
2
3
4
5
6
7
8
9
10
11
12
13
14
15
16
17
18
19
20
21
22
23
24
25
26
27
28
29
30
31
32
33
34
35
36
37
38
39
40
41
42
43
44
45
46
47
48
49
50
51
52
53
54
55
56
57
58
59
60
61
#include "memlayout.h"

uint64 sys_mmap(void){
uint64 addr;
int length, prot, flags, fd, offset;
struct proc *p = myproc();

// Fetch arguments from user space
if(argaddr(0, &addr) < 0 || argint(1, &length) < 0 || argint(2, &prot) < 0
|| argint(3, &flags) < 0 || argint(4, &fd) < 0 || argint(5, &offset) < 0){
return -1;
}

if(addr != 0)
panic("sys_mmap: addr not set 0");
if(offset != 0)
panic("sys_mmap: offset not set 0");

// Check if file's prot bits match flags and file perms.
// You cannot write back any changes to a unwritable file.
struct file *f = p->ofile[fd];
if((!(f->writable)) && (flags & MAP_SHARED) && (prot & PROT_WRITE)){
printf("sys_mmap: cannot write back any changes to a unwritable file.\n");
return -1;
}
// you cannot read from a unreadable file either
if((!(f->readable)) && (prot & PROT_READ)){
printf("sys_mmap: cannot read from a unreadable file.\n");
return -1;
}

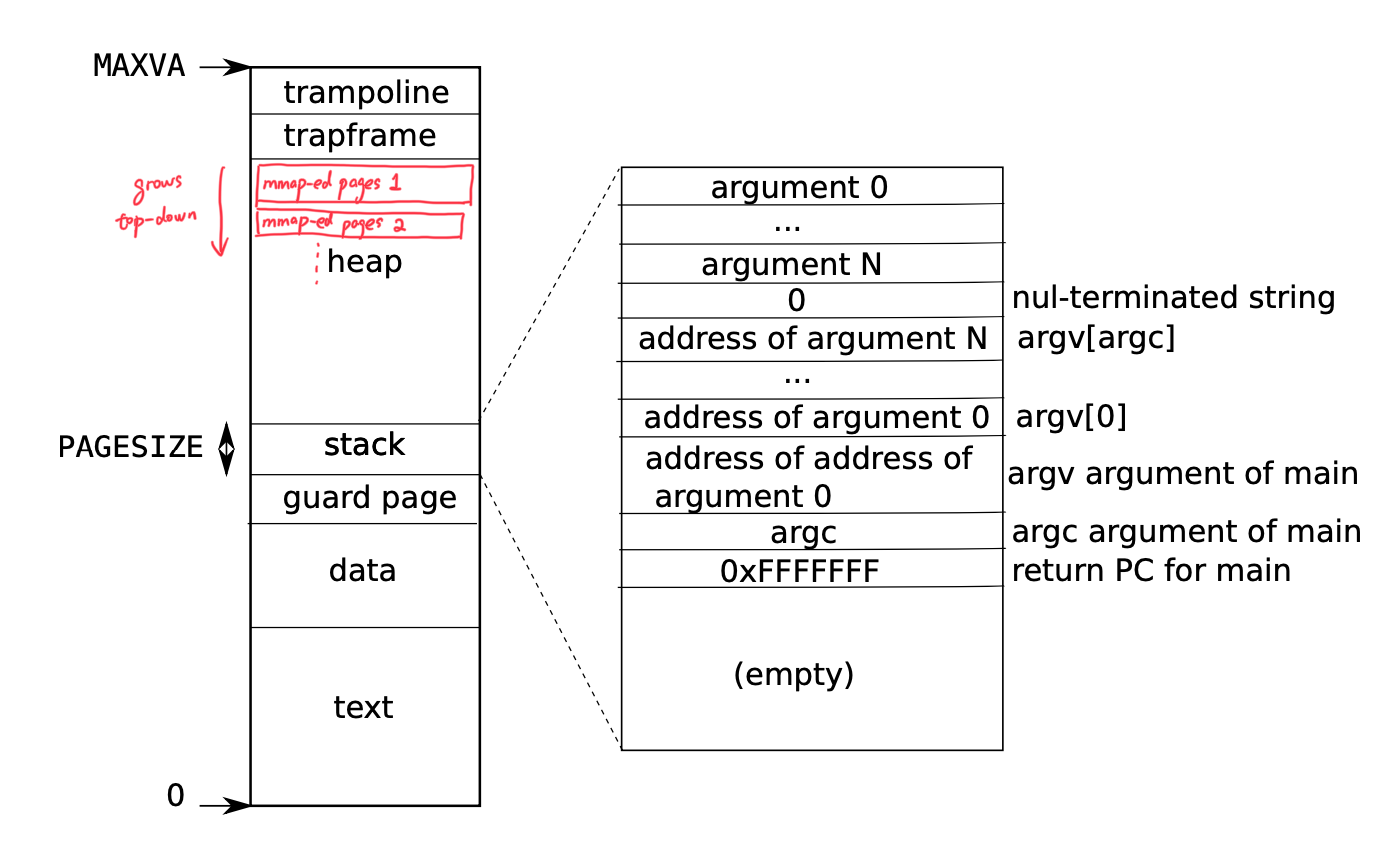
// Find free VMA, and calculate where to put mmap-ed user momory
// mmap-ed memory grows top-down from trampoline page
struct vma *vma = 0;
uint64 min_mmap_addr = TRAPFRAME;
for (int i = 0; i < NVMA; i++){
struct vma *v = &p->vma[i];
if(!v->used){
if(!vma){
vma = v;
v->used = 1;
}
} else if(v->addr < min_mmap_addr){
min_mmap_addr = PGROUNDDOWN(v->addr);
}
}
if(!vma){
printf("sys_map: unable to find free VMA\n");
return -1; // Unable to find free VMA
}

// Fill in state info into vma
vma->len = length;
vma->prot = prot;
vma->flags = flags;
vma->f = filedup(f); // Increase the file's reference count
vma->offset = offset;
vma->addr = min_mmap_addr - PGROUNDUP(length);

return vma->addr;
}

mmap缺页中断处理程序实现

由于我们使用了懒加载策略,因此用户在访问mmap对应页面时会产生缺页中断,这就要求我们在trap处理函数加入处理mmap映射地址的逻辑。更加准确的来说,我们需要查询我们的VMA列表,看看当前访问的虚拟地址属于哪个文件的映射等信息,然后我们尝试读取文件到内存中,并设置该位置到用户空间虚拟地址的映射。

我们先考虑实现一个缺页中断的处理函数mmap_handler(),我们放在kernel/vm.c下:

1
2
3
4
5
6
7
8
9
10
11
12
13
14
15
16
17
18
19
20
21
22
23
24
25
26
27
28
29
30
31
32
33
34
35
36
37
38
39
40
41
42
43
44
45
46
47
48
49
50
51
52
53
54
55
56
57
58
59
60
61
62
63
64
65
66
67
68
69
70
71
#include "spinlock.h"
#include "proc.h"
#include "fcntl.h"
#include "sleeplock.h"
#include "file.h"

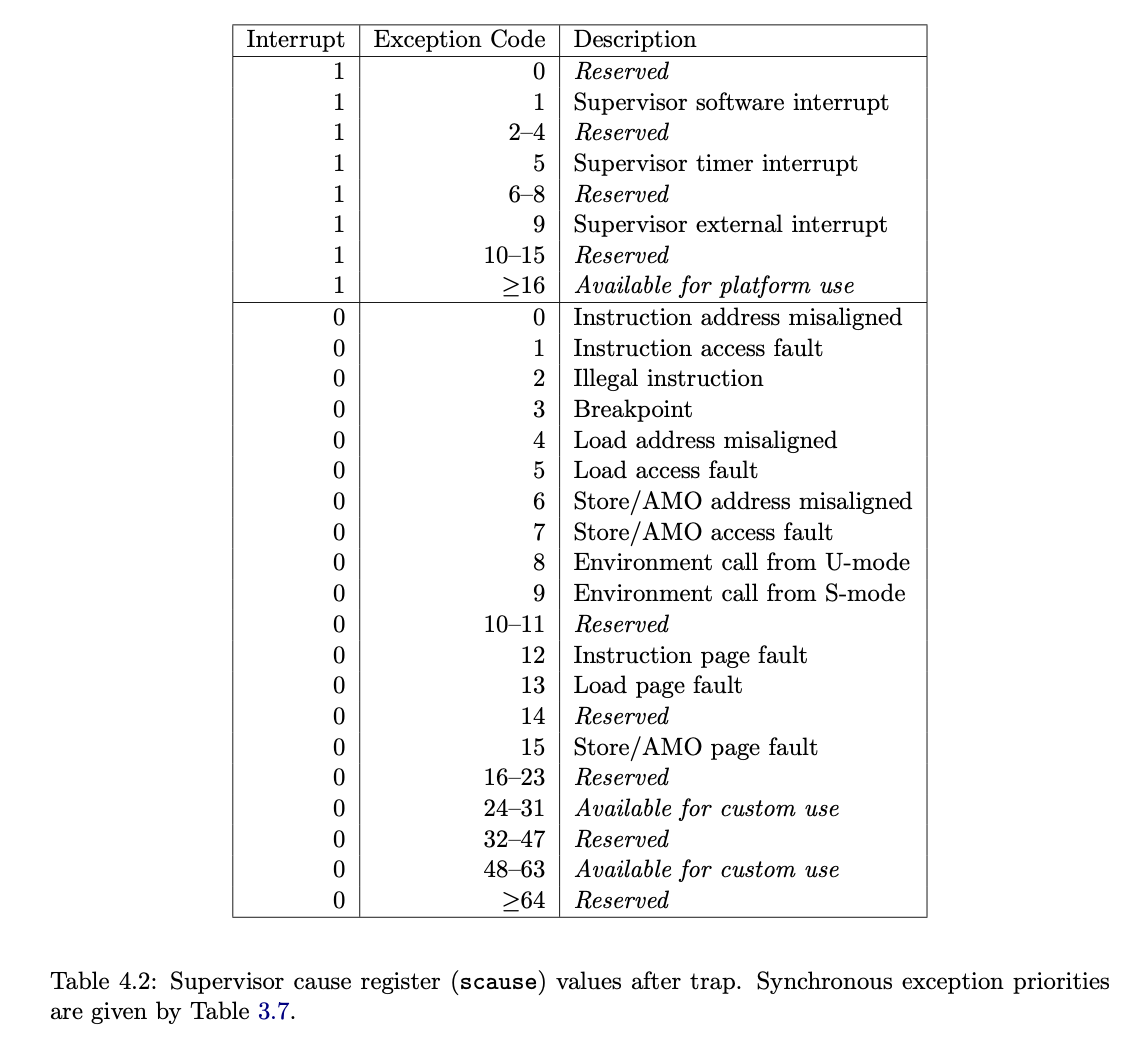
// Handle page fault caused by mmaped va,
// Return 0 on success, -1 on failure, -2 on invalid va
int mmap_handler(uint64 va, int scause) {
struct proc *p = myproc();
int vma_index = -1;
if (va >= MAXVA) {
printf("va cannot be greater than MAXVA: %p\n", va);
return -2;
}
// Scan the VMA list to match va
for (int i = 0; i < NVMA; i++){
struct vma* vma = &p->vma[i];
if(vma->used == 1 && va >= vma->addr
&& va < vma->addr + PGROUNDUP(vma->len)){
vma_index = i;
break;
}
}
if(vma_index == -1) {
return -2; // VMA not found
}
struct vma *v = &p->vma[vma_index];

// Check perm bits
if(scause == 13 && !(v->prot & PROT_READ)) {
printf("mmap_handler: cannot read from unreadable vma\n");
return -1; // cannot read from unreadable vma
}
if(scause == 15 && !(v->prot & PROT_WRITE)) {
printf("mmap_handler: cannot write to unwritable vma\n");
return -1; // cannot write to unwritable vma
}

// Allocate physical page
va = PGROUNDDOWN(va);
void *pa = kalloc();
if(pa == 0){
panic("mmap_handler: kalloc failed");
}
memset(pa, 0, PGSIZE);

// Load page from file
struct file *f = v->f;
ilock(f->ip);
readi(f->ip, 0, (uint64)pa, v->offset + PGROUNDDOWN(va - v->addr), PGSIZE);
iunlock(f->ip);

// Map the page to user space
int perm = PTE_U;
if(v->prot & PROT_READ){
perm |= PTE_R;
}
if(v->prot & PROT_WRITE){
perm |= PTE_W;
}
if(v->prot & PROT_EXEC){
perm |= PTE_X;
}
if(mappages(p->pagetable, va, PGSIZE, (uint64)pa, perm) < 0){
printf("mmap_handler: failed to map page to user space. va: %p, pa: %p\n", va, pa);
kfree(pa);
return -1; // Failed to map page to user space
}
return 0;
}

另外需要说明的是,我们需要在kernel/defs.h中加入该函数的声明,以方便在trap处理函数中调用:

1
2
3
4
5
6
7
8
9
10
11
12
13
14
15
16
17
18
// vm.c
void kvminit(void);
void kvminithart(void);
void kvmmap(pagetable_t, uint64, uint64, uint64, int);
int mappages(pagetable_t, uint64, uint64, uint64, int);
pagetable_t uvmcreate(void);
void uvminit(pagetable_t, uchar *, uint);
uint64 uvmalloc(pagetable_t, uint64, uint64);
uint64 uvmdealloc(pagetable_t, uint64, uint64);
int uvmcopy(pagetable_t, pagetable_t, uint64);
void uvmfree(pagetable_t, uint64);
void uvmunmap(pagetable_t, uint64, uint64, int);
void uvmclear(pagetable_t, uint64);
uint64 walkaddr(pagetable_t, uint64);
int copyout(pagetable_t, uint64, char *, uint64);
int copyin(pagetable_t, char *, uint64, uint64);
int copyinstr(pagetable_t, char *, uint64, uint64);
int mmap_handler(uint64, int);

trap处理函数修改

我们通过查询 RISC-V 的手册 RISC-V privileged instructions,看到如下表,表示了不同类型的 trap 发生时 scause 寄存器的数值:

缺页中断时,scause寄存器信息可能是13或者15。因此,我们将其作为判断依据,将kernel/trap.c下的usertrap修改为如下:

1
2
3
4
5
6
7
8
9
10
11
12
13
14
15
16
17
18
19
20
21
22
23
24
25
26
27
28
29
30
31
32
33
34
35
36
37
38
39
40
41
42
43
44
45
46
47
48
49
50
51
52
53
54
55
56
57
//
// handle an interrupt, exception, or system call from user space.
// called from trampoline.S
//
void
usertrap(void)
{
int which_dev = 0;

if((r_sstatus() & SSTATUS_SPP) != 0)
panic("usertrap: not from user mode");

// send interrupts and exceptions to kerneltrap(),
// since we're now in the kernel.
w_stvec((uint64)kernelvec);

struct proc *p = myproc();

// save user program counter.
p->trapframe->epc = r_sepc();

if(r_scause() == 8){
// system call

if(p->killed)
exit(-1);

// sepc points to the ecall instruction,
// but we want to return to the next instruction.
p->trapframe->epc += 4;

// an interrupt will change sstatus &c registers,
// so don't enable until done with those registers.
intr_on();

syscall();
} else if((which_dev = devintr()) != 0){
// ok
} else if (r_scause() == 13 || r_scause() == 15) {
if(mmap_handler(r_stval(), r_scause()) < 0) {
p->killed = 1;
}
} else {
printf("usertrap(): unexpected scause %p pid=%d\n", r_scause(), p->pid);
printf(" sepc=%p stval=%p\n", r_sepc(), r_stval());
p->killed = 1;
}

if(p->killed)
exit(-1);

// give up the CPU if this is a timer interrupt.
if(which_dev == 2)
yield();

usertrapret();
}

munmap取消映射函数实现

接下来,我们试着实现一下munmap,根据提示,我们需要将VMA分配的页面进行释放,在必要情况下还需要将修改内容写回磁盘。那么同理,我们也是先尝试在VMA列表中查找对应地址所在的VMA相关信息,然后根据三种情形(头部释放、尾部释放和全部释放)来进行讨论,如果发生了全部释放,我们就需要将已修改的页面写回磁盘。

根据提示,我们可以直接不检查D脏位就将文件写回… 偷个懒这里直接用了filewrite。在munmap中我们要求传入的addr严格与页面大小对齐。

最后我们在kernel/sysfile.c下实现如下代码:

1
2
3
4
5
6
7
8
9
10
11
12
13
14
15
16
17
18
19
20
21
22
23
24
25
26
27
28
29
30
31
32
33
34
35
36
37
38
39
40
41
42
43
44
45
46
47
48
49
50
51
52
53
54
uint64 sys_munmap(void) {
uint64 addr;
int length;
int vma_index = -1;
struct proc *p = myproc();

// Fetch arguments from user space
if(argaddr(0, &addr) < 0 || argint(1, &length) < 0){
return -1;
}

// Scan the VMA list to match va
for (int i = 0; i < NVMA; i++){
struct vma* vma = &p->vma[i];
if(vma->used == 1 && addr >= vma->addr
&& addr < vma->addr + vma->len){
vma_index = i;
break;
}
}
if(vma_index == -1){
printf("sys_munmap: VMA not found.\n");
return -1; // VMA not found
}
struct vma *v = &p->vma[vma_index];

// Check munmap range
if(addr != v->addr && addr + length != v->addr + v->len){
printf("sys_munmap: mmap range does not match VMA."
"va: %p, len: %d\n", addr, length);
return -1;
}
if(addr == v->addr){
v->addr += length;
v->len -= length;
} else if(addr + length == v->addr + v->len){
v->len -= length;
}

// Write back to file if configured
if(v->flags == MAP_SHARED && (v->prot & PROT_WRITE)){
filewrite(v->f, addr, length);
}
// Remove mappings
uvmunmap(p->pagetable, addr, PGROUNDUP(length) / PGSIZE, 1);

// Close the file if the all mappings are removed in the VMA
if(v->len == 0){
fileclose(v->f);
v->used = 0;
}

return 0;
}

需要注意到的是,VMA下的内存页并不一定都设置了映射,有些页面已经从文件中读入并设置了正确的映射,其余的则在页表中处于无效状态,即PTE_V位并没有设置。如果我们对懒分配的页面也执行了uvmunmap,根据原来的逻辑,内核会直接陷入panic,因此,我们要修改kernel/vm.c下的uvmunmap代码,在判断出当前PTE的有效位未设置后直接continue

1
2
3
4
5
6
7
8
9
10
11
12
13
14
15
16
17
18
19
20
21
22
23
24
25
26
27
// Remove npages of mappings starting from va. va must be
// page-aligned. The mappings must exist.
// Optionally free the physical memory.
void
uvmunmap(pagetable_t pagetable, uint64 va, uint64 npages, int do_free)
{
uint64 a;
pte_t *pte;

if((va % PGSIZE) != 0)
panic("uvmunmap: not aligned");

for(a = va; a < va + npages*PGSIZE; a += PGSIZE){
if((pte = walk(pagetable, a, 0)) == 0)
panic("uvmunmap: walk");
if((*pte & PTE_V) == 0)
// panic("uvmunmap: not mapped");
continue;
if(PTE_FLAGS(*pte) == PTE_V)
panic("uvmunmap: not a leaf");
if(do_free){
uint64 pa = PTE2PA(*pte);
kfree((void*)pa);
}
*pte = 0;
}
}

exit函数修改

根据提示,我们需要修改kernel/proc.c下的exit函数。在进程退出前,将进程的已映射区域取消映射,其实操作和munmap类似:

1
2
3
4
5
6
7
8
9
10
11
12
13
14
15
16
17
18
19
20
21
22
23
24
25
26
27
28
29
30
31
32
33
34
35
36
37
38
39
40
41
42
43
44
45
46
47
48
49
50
51
52
53
54
55
56
57
// Exit the current process.  Does not return.
// An exited process remains in the zombie state
// until its parent calls wait().
void
exit(int status)
{
struct proc *p = myproc();

if(p == initproc)
panic("init exiting");

// Close all open files.
for(int fd = 0; fd < NOFILE; fd++){
if(p->ofile[fd]){
struct file *f = p->ofile[fd];
fileclose(f);
p->ofile[fd] = 0;
}
}

// Remove mappings of mmap-ed pages
for (int i = 0; i < NVMA; i++){
struct vma *v = &p->vma[i];
if(v->used){
if(v->flags == MAP_SHARED && (v->prot & PROT_WRITE)){
filewrite(v->f, v->addr, v->len);
}
fileclose(v->f);
uvmunmap(p->pagetable, v->addr, PGROUNDUP(v->len) / PGSIZE, 1);
v->used = 0;
}
}

begin_op();
iput(p->cwd);
end_op();
p->cwd = 0;

acquire(&wait_lock);

// Give any children to init.
reparent(p);

// Parent might be sleeping in wait().
wakeup(p->parent);

acquire(&p->lock);

p->xstate = status;
p->state = ZOMBIE;

release(&wait_lock);

// Jump into the scheduler, never to return.
sched();
panic("zombie exit");
}

fork函数修改

根据提示,我们需要为kernel/proc.c下的fork函数做出少许修改。其中,我们需要为子进程复制一份与父进程完全一致的VMA列表,另外我们需要将VMA中指向的文件引用计数加一。

因此代码如下:

1
2
3
4
5
6
7
8
9
10
11
12
13
14
15
16
17
18
19
20
21
22
23
24
25
26
27
28
29
30
31
32
33
34
35
36
37
38
39
40
41
42
43
44
45
46
47
48
49
50
51
52
53
54
55
56
57
58
// Create a new process, copying the parent.
// Sets up child kernel stack to return as if from fork() system call.
int
fork(void)
{
int i, pid;
struct proc *np;
struct proc *p = myproc();

// Allocate process.
if((np = allocproc()) == 0){
return -1;
}

// Copy user memory from parent to child.
if(uvmcopy(p->pagetable, np->pagetable, p->sz) < 0){
freeproc(np);
release(&np->lock);
return -1;
}
np->sz = p->sz;

// copy saved user registers.
*(np->trapframe) = *(p->trapframe);

// Cause fork to return 0 in the child.
np->trapframe->a0 = 0;

// increment reference counts on open file descriptors.
for(i = 0; i < NOFILE; i++)
if(p->ofile[i])
np->ofile[i] = filedup(p->ofile[i]);
np->cwd = idup(p->cwd);

// copy VMA list
for(int i = 0; i < NVMA; i++){
if(p->vma[i].used){
memmove(&np->vma[i], &p->vma[i], sizeof(p->vma[i]));
filedup(p->vma[i].f);
}
}

safestrcpy(np->name, p->name, sizeof(p->name));

pid = np->pid;

release(&np->lock);

acquire(&wait_lock);
np->parent = p;
release(&wait_lock);

acquire(&np->lock);
np->state = RUNNABLE;
release(&np->lock);

return pid;
}

测试

在主目录下我们尝试运行make clean; make qemu,然后在xv6中执行mmaptest

基本功能的测试都通过了…

总结

现在我们对整个Lab进行测试,首先有几点需要注意:

  • 请在主目录下添加time.txt文件,写入你在这个Lab所花时间。

  • 如果机器/虚拟机性能弱鸡的,请把主目录下grade-lab-mmap文件里面的timeout参数改大点,不然可能你的测试项目还没跑完他就跳出给你标个大大的FAIL…

接下来运行make grade,如下是测试结果:

完结撒花了属于是…

感觉6.S081这门课的深度已经超过我想象了,帮助我通过实验来巩固理解,而不是整点八股概念啥的。整个课程后部分的论文网课感觉也是很有收获,头脑风暴的感觉很开心hhh